SpeedCloud 2.0 Partner Portal - User Manual
Table of Contents:
- Creation of a Virtual machine
- Accessing the Virtual Machines
- Changing OS of a Virtual Machine
- Upgrading the compute resources for a Virtual Machine
- Firewall management of a Virtual Machine
- Creation of Load Balancer
- Load Balancing Algorithms
- Attaching and detaching of VM to the Load Balancer
- Managing the Load Balancer
- Creation of Block storage devices
- Resizing block storage devices
- Working with snapshots
- Detaching block storage device from a VM
- Attaching block storage device to a VM
- Deletion of block storage devices
SpeedCloud Overview and Operation Flow Chart
Enterprises and organizations must deliver modern applications and services leveraging cloud native technologies and adopt true multi-cloud approach for increasingly diverse application architecture. These technologies offer efficient and effective IT services, but it can be challenging for organizations to realize these benefits without proper technological solutions and platform. Building innovative cloud native applications requires cloud-native ready infrastructure with specific feature-sets to deliver expected results with robustness and stability without compromising on performance.
NxtGen SpeedCloud™ offers unified infrastructure platform to streamline application development efforts across their heterogeneous IT environments. SpeedCloud platform empowers organizations to deliver distinctive application deployment model by providing both Virtual Machines and Container management platform under single manageability control pane thus reducing the friction of maintaining siloed infrastructure environments. These organizations thus gain additional value for their DevOps and Development teams by generating more revenue and making their application development efforts more friction less and cost effective.
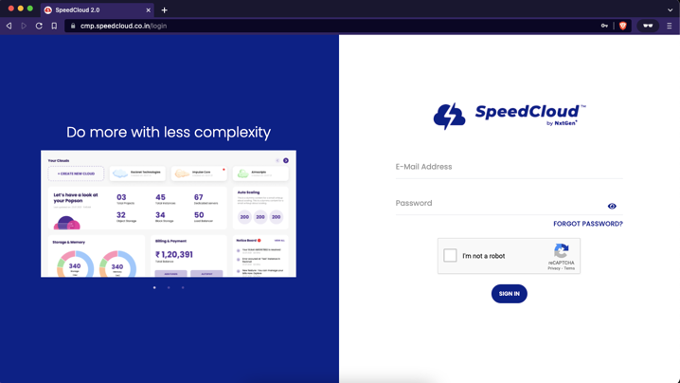
The SpeedCloud Portal is accessible over https://cmp.speedcloud.co.in. SpeedCloud 2.0 offers a unified view under a single portal (for Partner and Customers) for managing various resources and enables deployment over multiple compute zones. SpeedCloud 2.0 also offers additional services in addition to the IaaS services. SpeedCloud 2.0 brings self-service network models with built-in security features and other various networking features.
Portal URI: https://cmp.speedcloud.co.in
Onboarding
Below is the overview of the flow of onboarding of partners and the customers.
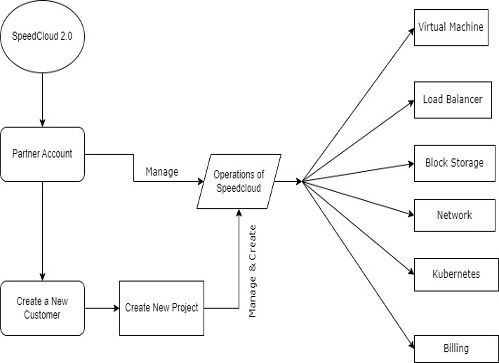
Creation of customer in the Partner Account:
Once you’re successfully onboarded as a partner on SpeedCloud, you may go ahead with the addition of your end-customer. Please login to https://cmp.speedcloud.co.in with the provided credentials from your Account Manager or SpeedCloud Sales Representative.
Assuming you’ve the partner access with you, please perform the below steps to onboard any customers on the portal:
- Login as a partner at https://cmp.speedcloud.co.in/
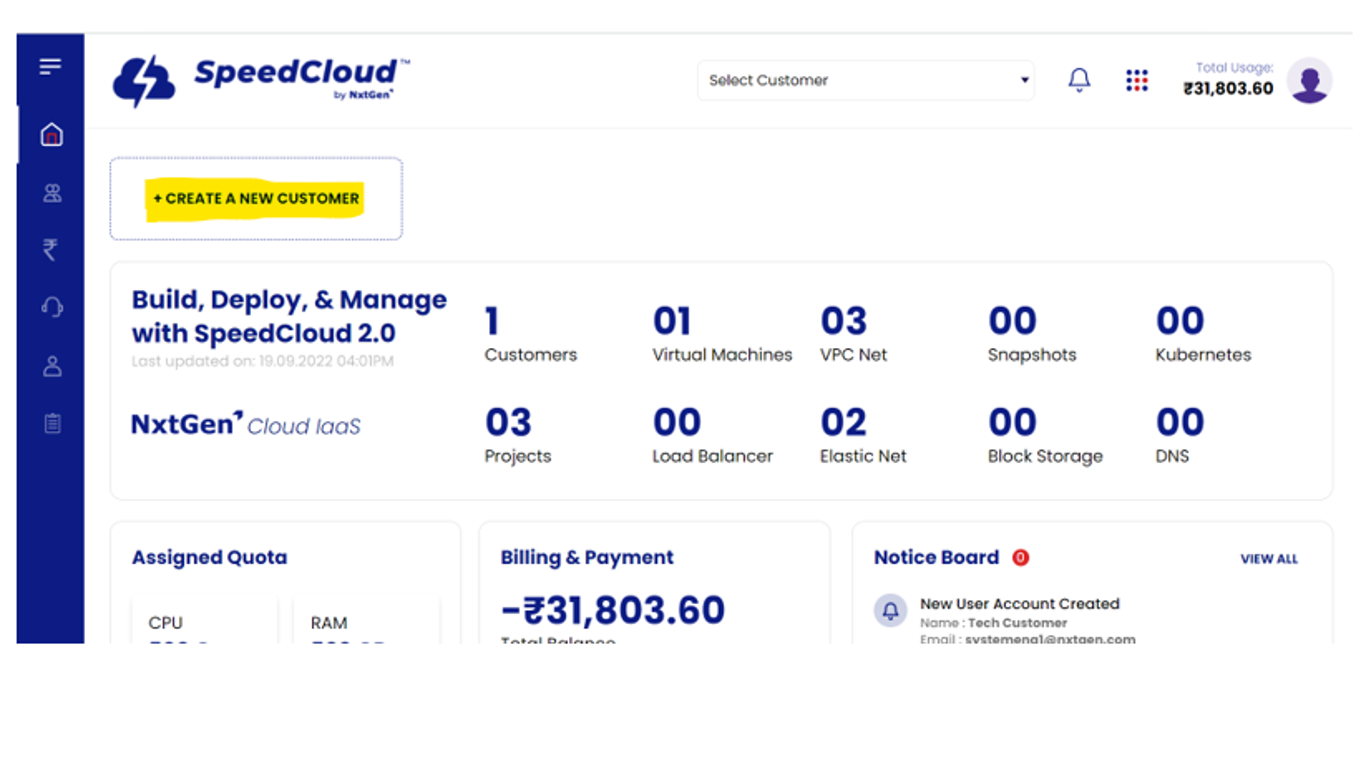
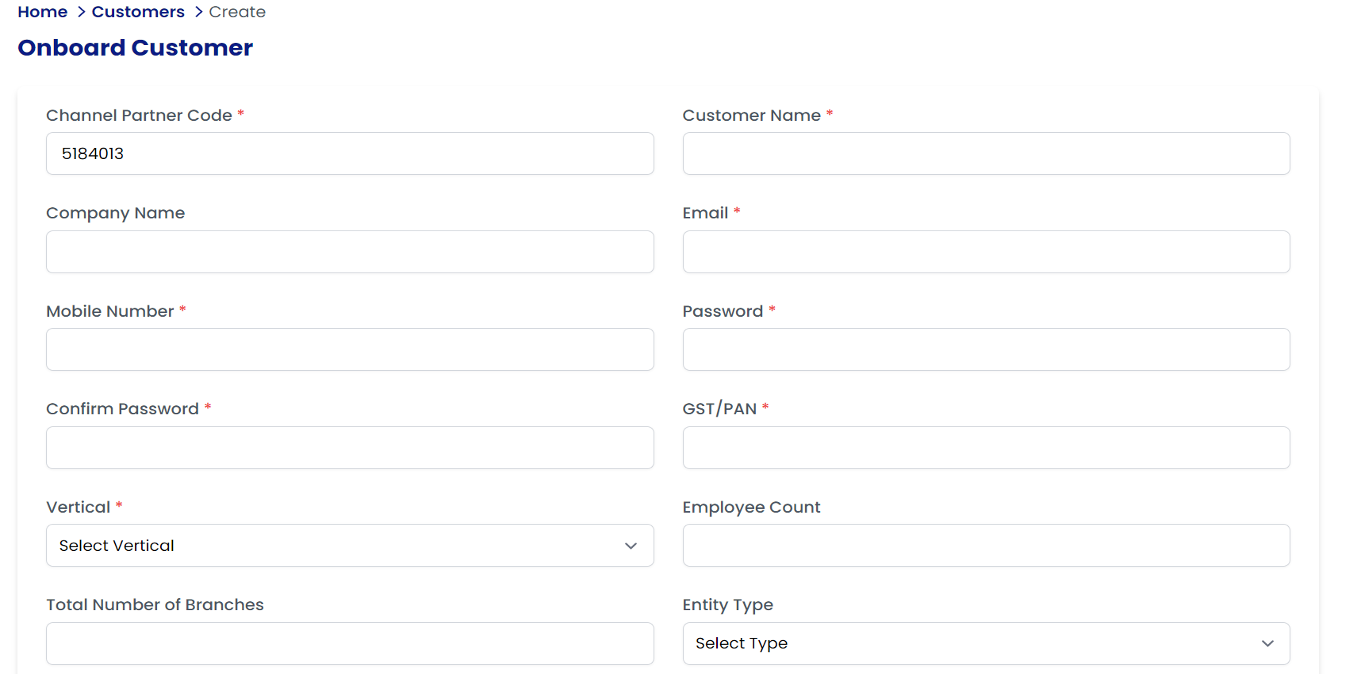
- Click on “Create a New Customer” (or) Navigate to “Customers” on the navigation pane and click “Onboard Customer”.
- Please submit all the mandatory details of the customer account.
- Important note on “Send Credentials Email to Customer”: Check the box only if the partner is willing to share the credentials to the customer. If this is checked, the credentials to the customer account will be sent over an email. The customer will be able to login on the same portal and manages resources.
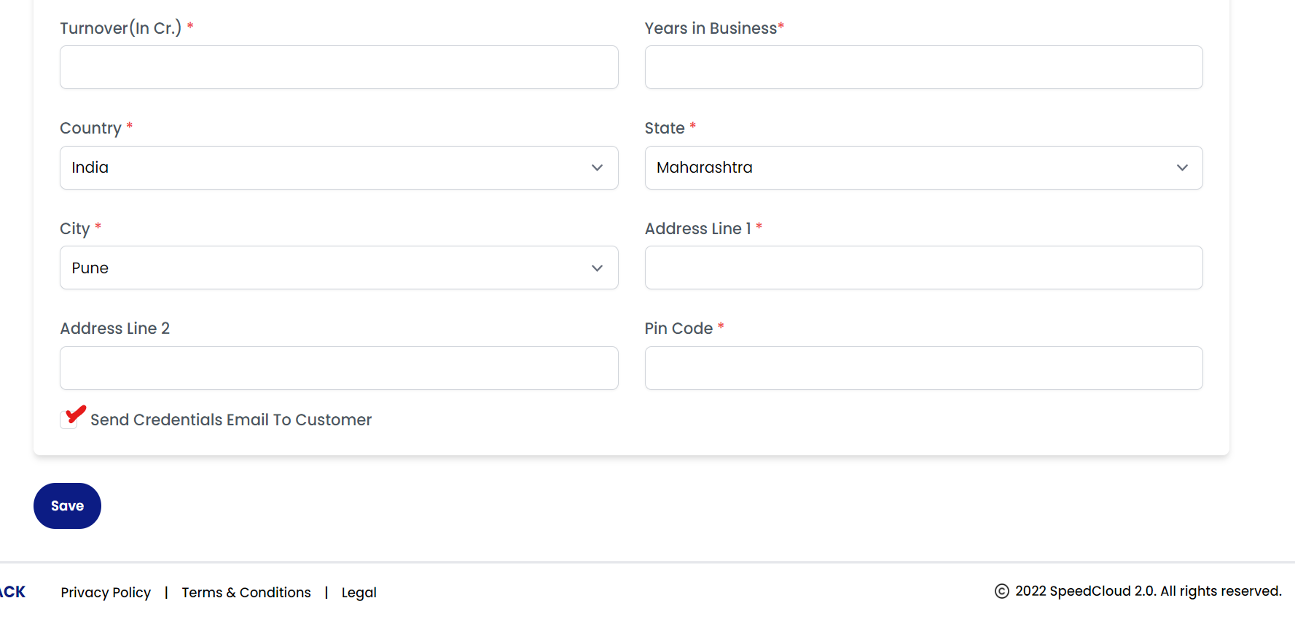
- Click “Save” to proceed with the account creation.
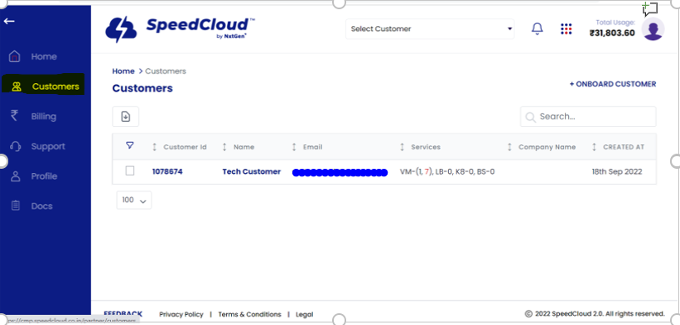
- A list of customers can be found under “Customers” tab in the navigation pane.
- Now that the customer account has been created, the partner can now login to the customer account using any of the methods defined below.
i. Go to “Customers” tab from the navigation pane, click on the customer’s name and click “Login as Customer”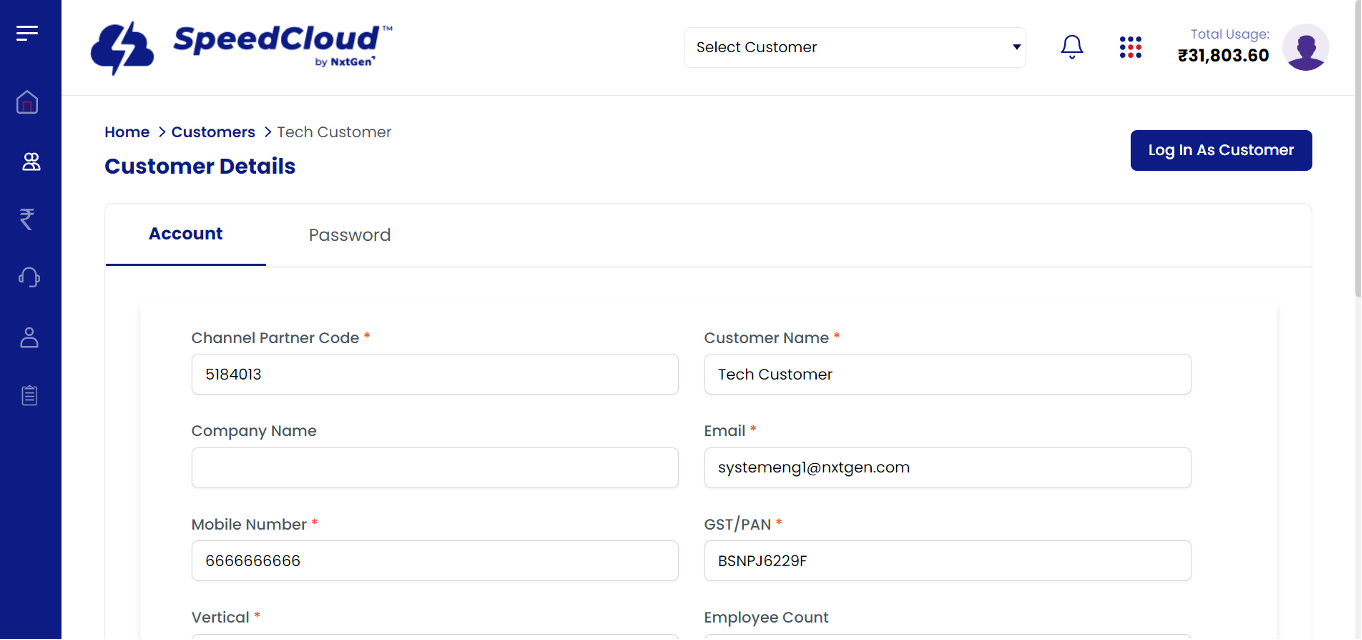
ii. Or as an easier option, choose the customer from the drop-down menu.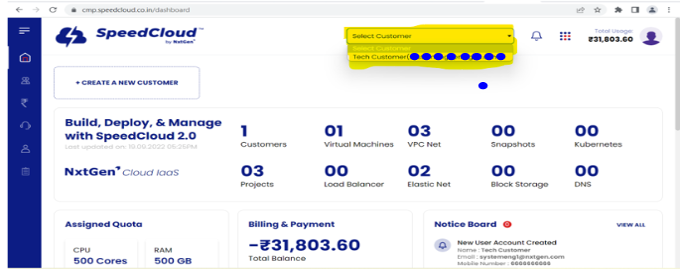
- The partner should now be able to perform operations in the customer account.
Creating Projects in customer accounts:
A project is a logical container for various resources. Resources can be logically grouped under projects for better management. For example, you can have projects for “development” and “production” projects.
Below is the procedure to the followed for creating projects:
- Login to a customer account from any of the methods described in the previous sections. To create a project, select “Create a New Project”.
- Please fill the mandatory details and click on “Create Project”.
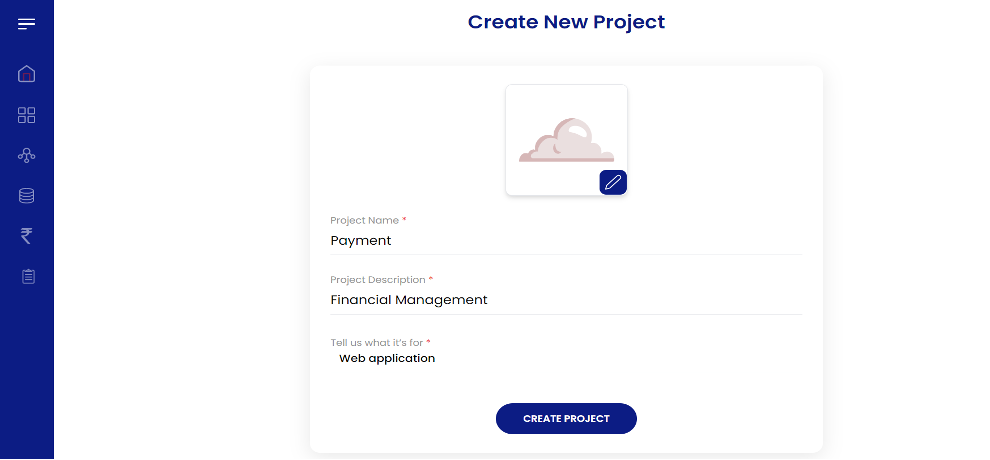
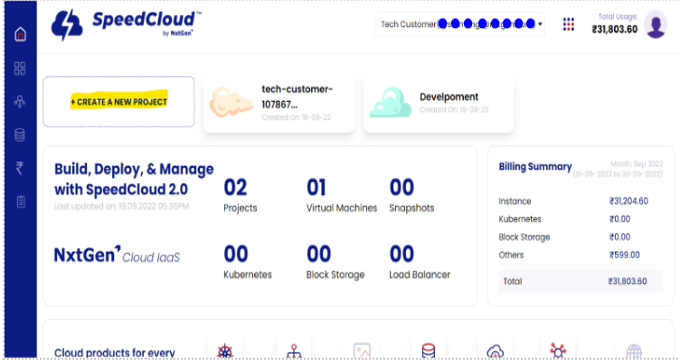
On the successful creation of a project, the project will start appearing on the dashboard.
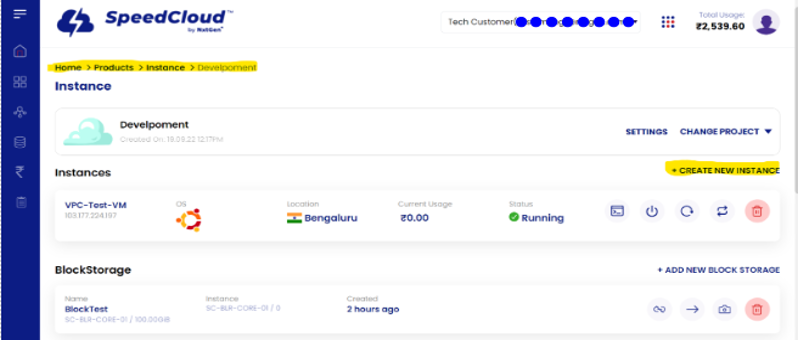
Virtual Machines
Virtual Machines are the compute instances with your preferred Operating Systems. SpeedCloud 2.0 Offers various Operating Systems for Linux-based and Windows. Virtual Machines come under the IaaS model. Flexibility to choose among plans is offered.
Creation of Virtual Machines:
- Login as partner at https://cmp.speedcloud.co.in
- In the quick navigation icon, select “Compute”.
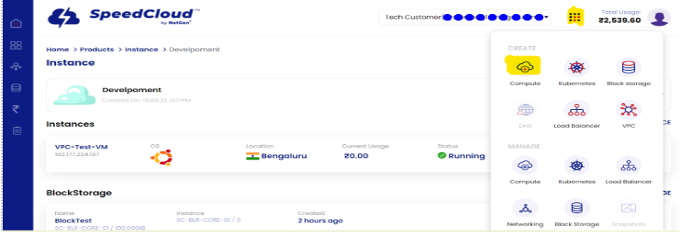
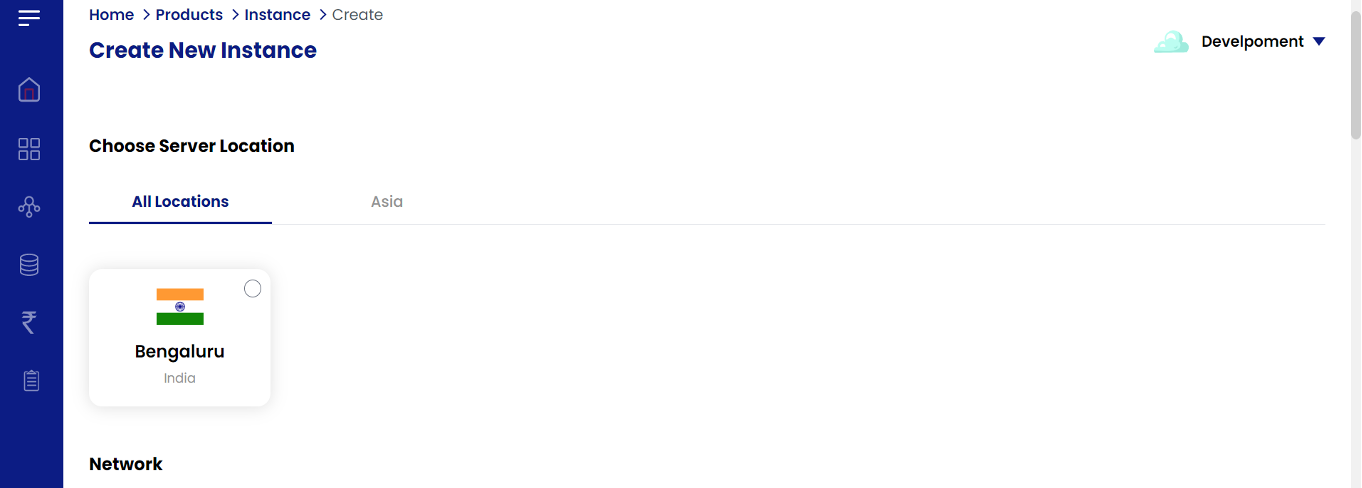
- Choose the name of the project where this Virtual Machine must be created. You can also change the project if we’re working on projects from the drop-down menu. Click on “Create New Instance” and a new instance creation wizard appears.
- In the “Create New Instance” wizard, please choose the compute infrastructure (a Data Centre) where the instance has to be created. Please choose “Bengaluru” for creating the instance at NxtGen’s Bangalore Data Centre.
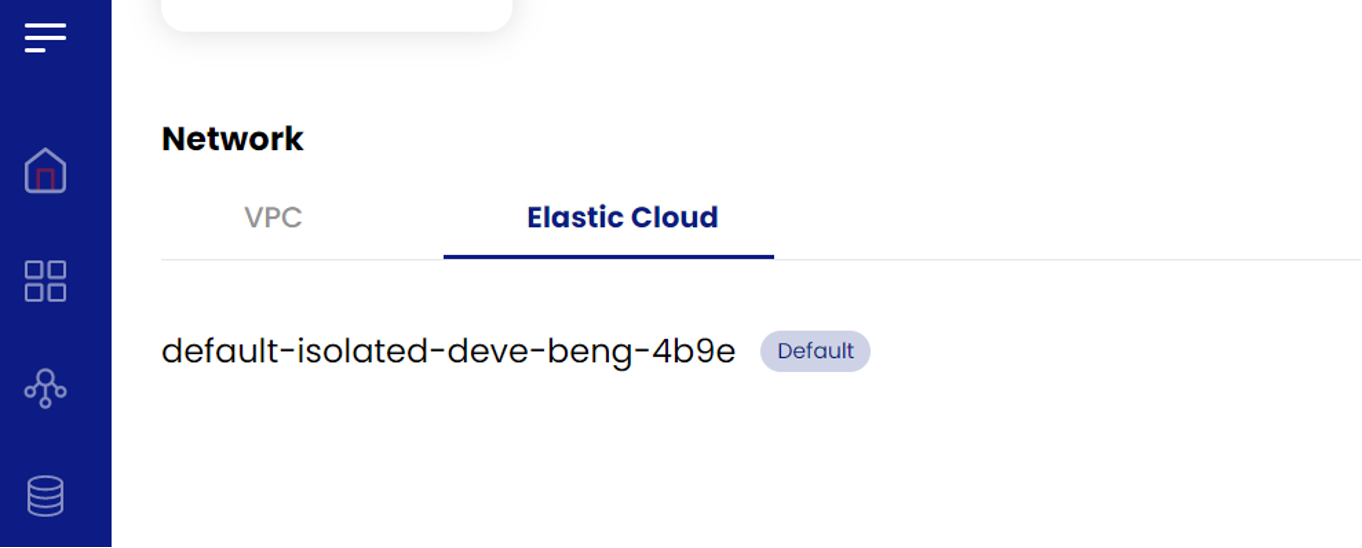
- Choose your preferred network model and the description is as below.
SpeedCloud 2.0 offers flexible networks and network tiers under different models. There is no limit on the number of networks created. All the created Software-defined networks are very flexible and are feature-rich. The networks are behind a NAT router, and offers Private IPv4 Addresses to all your Virtual Machines. Public IP addresses are handled transparently by a device known as NAT router. By default, the instance network performance has a hard limit of 5 Gbps on the private network; i.e., communication over the private network between or among the Virtual Machines is achievable up to 5 Gbps. Please also note that the networks are automatically created without any further configuration during the instance creation. For any of the network models, you may or may not choose to get a Public IP, depending on your requirement.
-
Elastic Networks – Elastic Network offers a flexible Virtual Network and has a simplified network operation. It offers basic functionalities like Firewall, Egress Firewall functionality, Load Balancer and Remote Access VPN. This is the recommended network model for most cases.
-
VPC Networks – VPC Networks offer network tiering, wherein there can be many networks and “routing” can be achieved across. VPC networks are same as Elastic Networks and have same features the Elastic Network has, but offer additional features like “Site to Site VPN”, fine-grained “Network Access Control Lists”.
Notes: The first VPC network will be automatically created, whereas on the subsequent VM creations, we’re supposed to pick the VPC and the VPC Network.
For any of the network models, you may or may not choose to get a Public IP, depending on your requirement.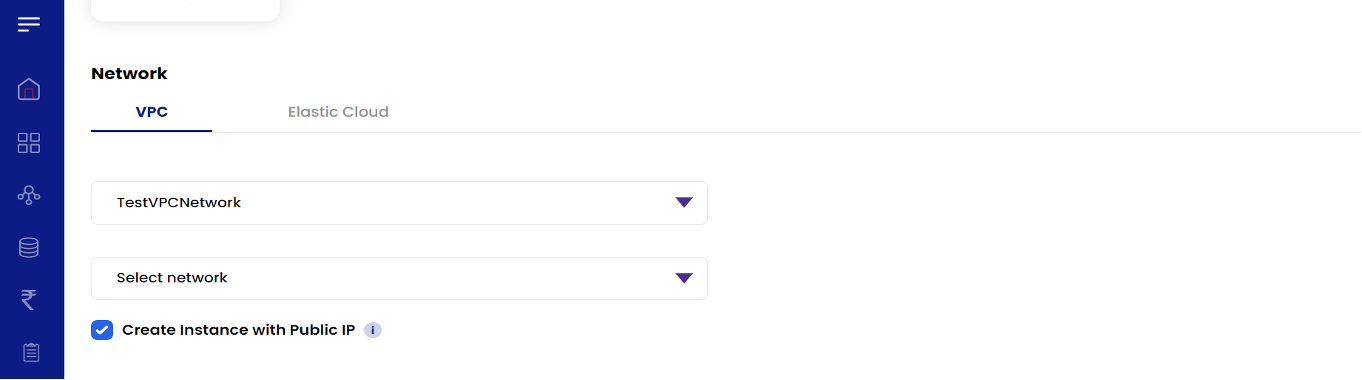
-
You may also choose to create the “Elastic Network”, or select already existing elastic networks.
-
Choose among various Operating Systems.

-
Choose the size of the Virtual Machine in-terms of vCPUs, vRAM and Storage. The sizing can be customized by choosing the custom plan or picking from already provided packages.
-
There are a variety of addons offered on SpeedCloud 2.0 and are defined below
a. Antivirus
b. Backup2Cloud
c. Managed Services
d. Database Managed Services
e. RDP & VPN
f. Firewall
g. Additional Data Transfer -
Optional: Personalize the Virtual Machine by running a startup script on only instance creation and during the instance change.
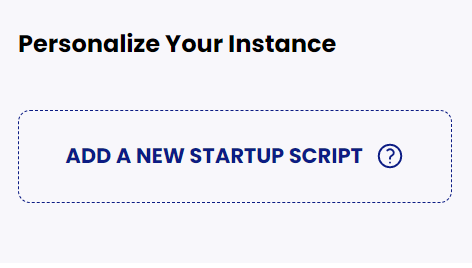
A start-up script is known as “userdata”, and this is only supported for Linux Guests. The “userdata” is executed on only first boot. For example, if you want the “apache2” package installed on your Virtual Machine, you can do so here.
- Select SSH Keypair to be associated with VM.
Users can bring their own SSH Public Key or create a keypair from the portal itself.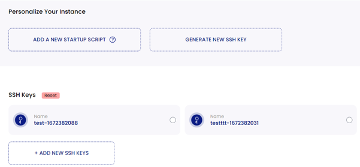
- Enter the hostnames and the description for your Virtual Machine.
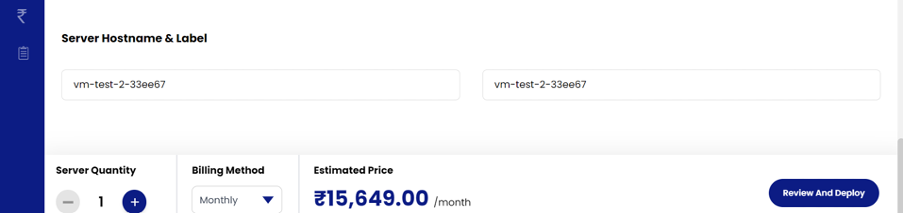
- Select the server quantity and billing method as Monthly / Quarterly / Semi-Annually / Yearly from the dropdown so that billing is generated according to the selected billing method.
- And click on review and deploy so that VM/instance is created successfully.

Accessing the Virtual Machines:
Accessing the Windows Virtual Machines over RDP:
- All Windows Virtual Machines can be accessed over the “Remote Desktop Protocol” Client. Native Clients can be found on Windows and Linux has a wide variety of clients like “Remmina”.
Accessing the Linux-based VM using SSH Client:
There are a wide range of SSH Clients found in the Linux-based distributions and Windows as well. You may use these utilities to perform SSH login. Linux -based Virtual Machines on SpeedCloud will by default come without a password set, and the access is allowed only when the Private Key is submitted. The private key will only be obtained once during the VM creation. You may also go with your Public Key during the VM creation, provided you’ve access to your private key.
a. Download the SSH Private Key file on to your computer.
b. On Windows, open any SSH Client, the Command Prompt also contains SSH Client. Please use the below command to connect.
ssh -i </path/to/keyfile> username@<IP>
For example: If the downloaded file name is MyKey-new-166456321.txt and is found at the Downloads folder
ssh -i "Downloads\john-doe-bangalore-166456321.txt" centos@103.177.224.129
Accept the fingerprint, and it should land in the Virtual Machine.
Below are the default usernames for Virtual Machines (These can be found on the portal)
- For Ubuntu Operating Systems, the username is "ubuntu"
- For CentOS Operating Systems, the username is "centos"
- For Debian Operating Systems, the username is "debian"
- For openSUSE Operating Systems, the username is "opensuse"
c. You may switch to the root user by specifying the command “sudo -i”
Changing the OS of the Virtual Machine:
Considerations: Please note that the OS change cannot happen between hetrogenous Operating Systems. To be specific, please note that the Linux-based Virtual Machines cannot be changed to Windows and vice-versa. Only homogenous changes are permitted. For example, the Linux-based distribution "Ubuntu 20.04" can be changed to "CentOS 8 - Stream"; Windows Operating System "Windows Server 2019" can be upgraded to other Windows only, like "Windows Server 2016". Proceed with utmost caution, as this will erase all the data on the OS disk. Any additional block storage devices will remain unaffected.
- To change the Operating System of the Virtual Machine, please click on the Virtual Machine and navigate to Settings
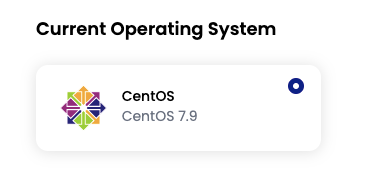
- If your current Virtual Machine is "CentOS 7.9", let us try to change it to "Ubuntu 20.04 LTS".
- Choose the desired Operating System under "Change Operating System" section.
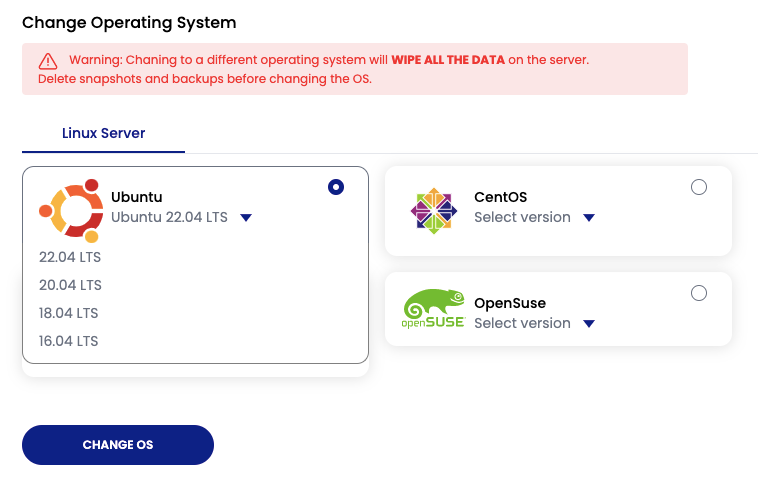
- Apply the changes.
- If your Operating System is Windows, similar fashion can be applied for Windows as well. Please choose the desired Operating System which are Windows.
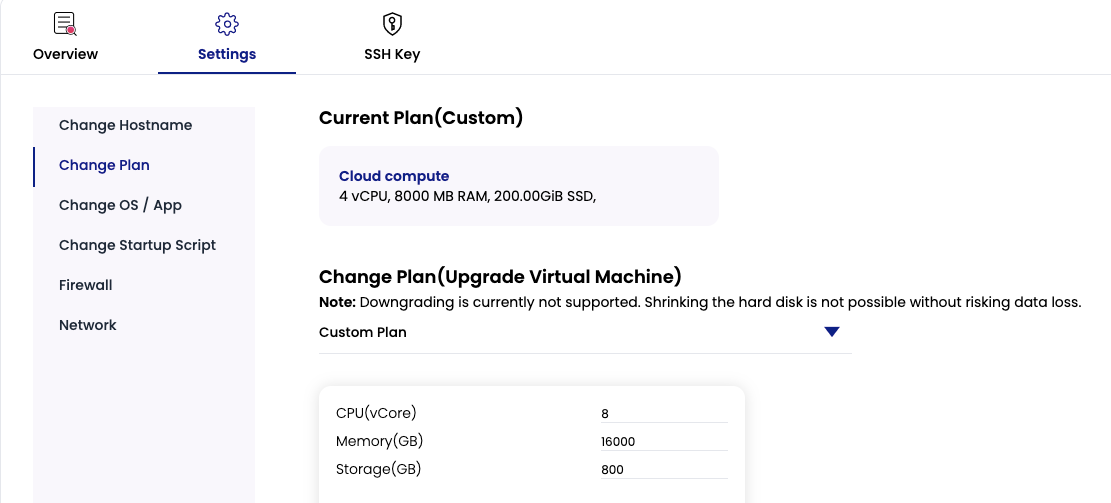
Upgrading the compute resources for a Virtual Machine:
Considerations: Please note that the VM will be automatically restarted on the Change Plan.
- To change the resources "Change Plan" in the VM "Settings".
- Select the "Change Plan", by reading the notice. Please enter the values for CPU, Memory and Storage (ROOT DISK)
Load Balancers
The platform also offers a Layer-4 Load Balancer (a “Network Load Balancer”) with basic Load Balancing functionalities. The Load Balancer also offers active L4 health checks, and ensures traffic reaches to only healthy backend servers.
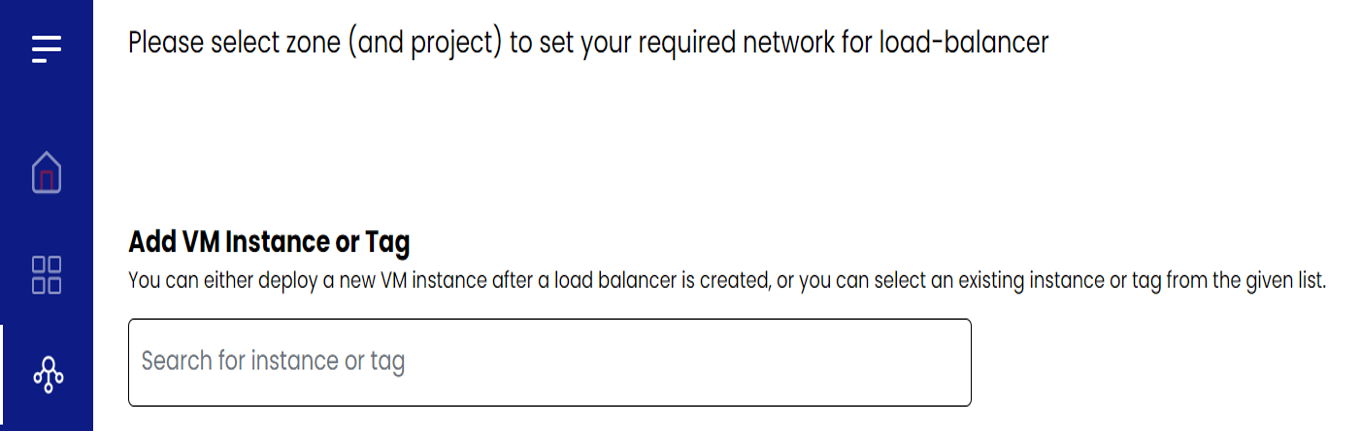
Creation of a Load Balancer:
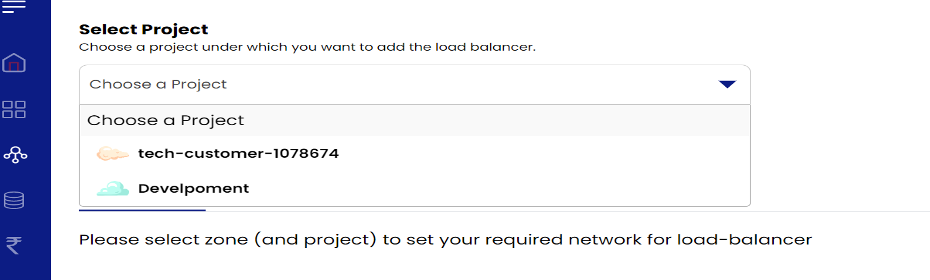
- In the quick navigation icon, select Load Balancer option.

- Click on the “Create” button and select the zone “Bengaluru”.

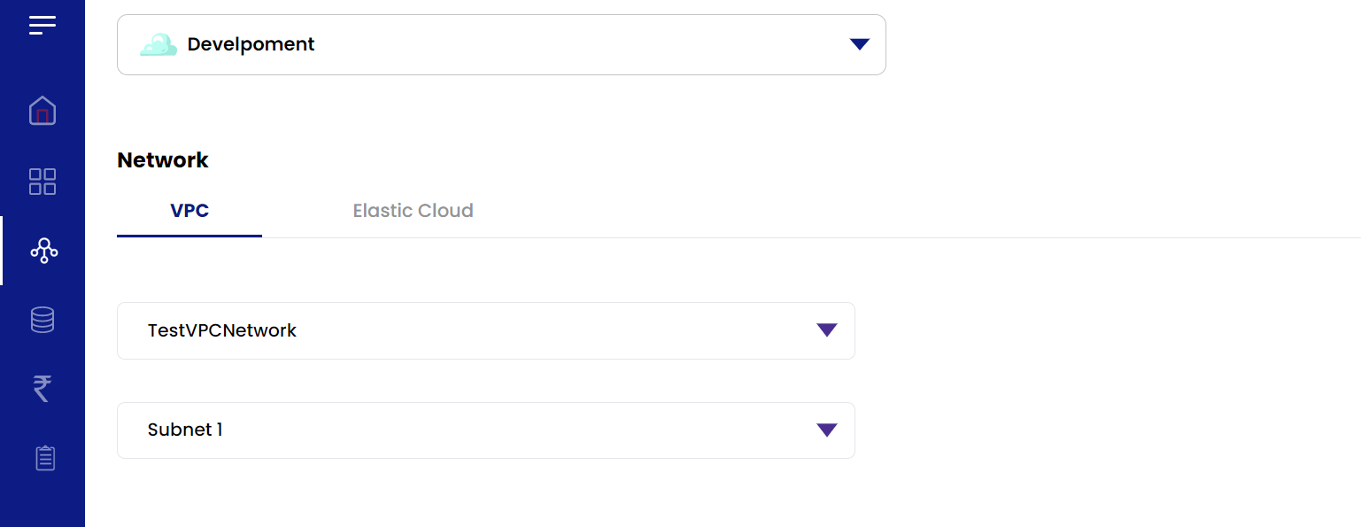
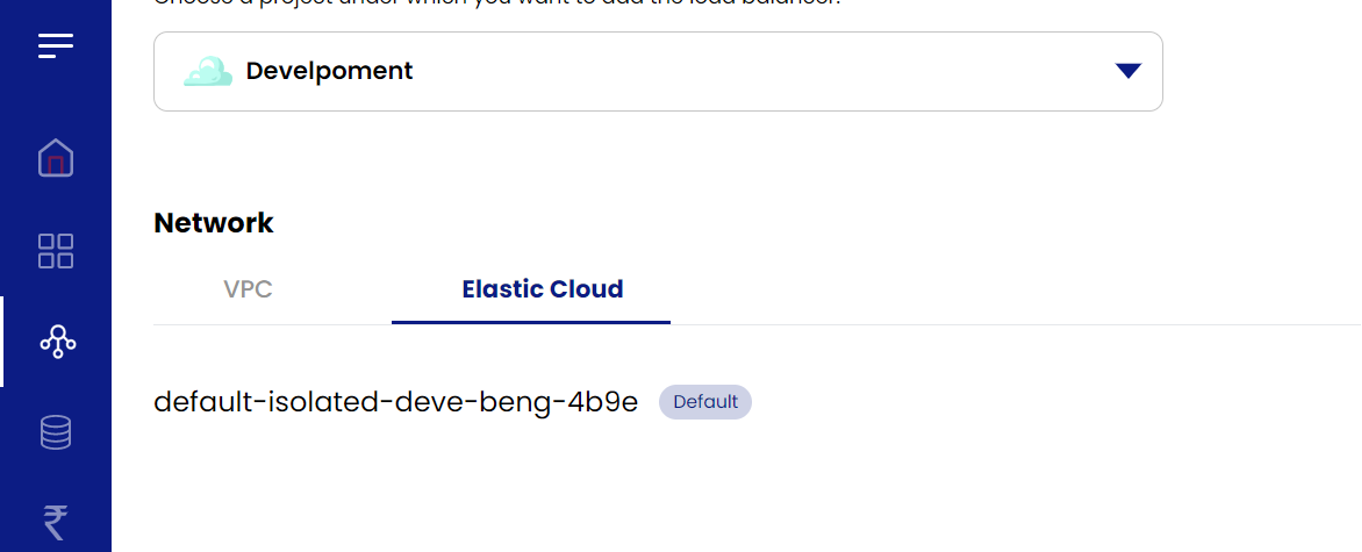
- Choose the project where the LB has to be placed.
- Choose the existing networks.
- Choose the existing Virtual Machine or create a new Virtual Machine to be added behind the Load Balancer.
- Set forwarding rules – Create the forwarding rules so that the traffic proxied through the Load Balancer. Please also note that SSL is by default passed-through to your Backend Servers.
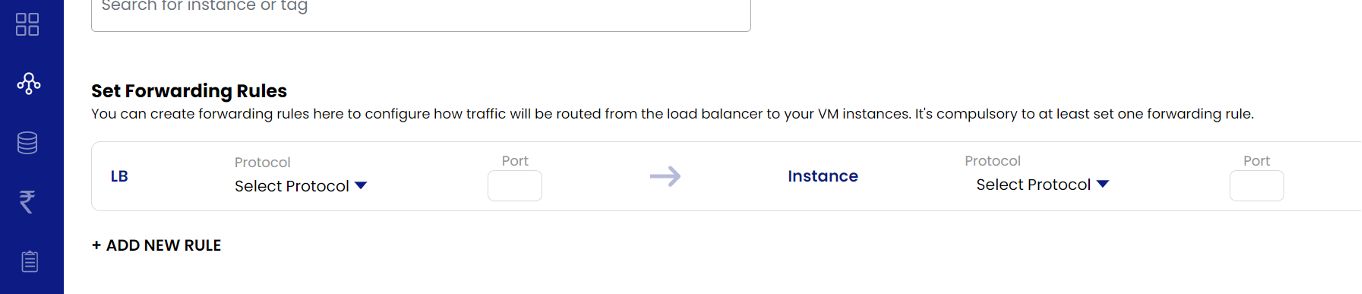
At least one rule to be configured is mandatory, though you can add and set multiple rules.
- In Advanced settings select the protocol from the dropdown as TCP/UDP/TCP Proxy and Algorithm as either one among Round Robin/Least Connections/Source.

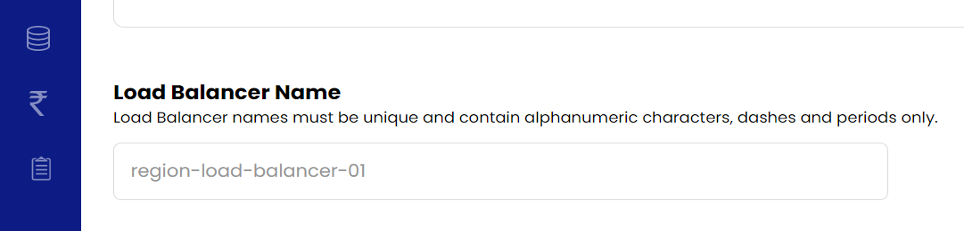
- Name of the “Load Balancer” must be unique and contain alphanumeric characters, dashes, and periods only.
- Select the billing method as Monthly / Quarterly / Semi-Annually / Yearly from the dropdown so that billing is generated according to the selected billing method.
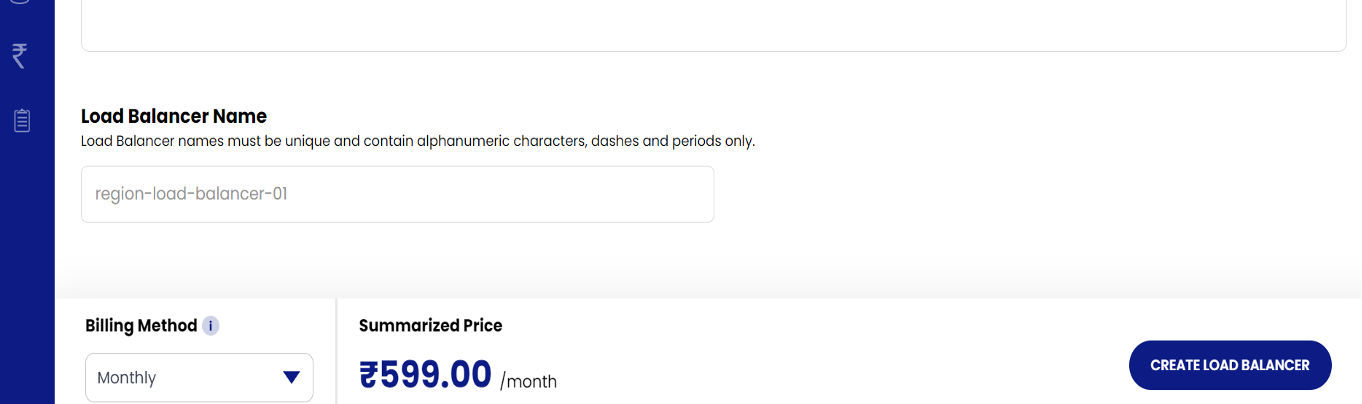
- The Load Balancer will be created once the “Create Load Balancer” is clicked.
Load Balancing Algorithms:
A Network Load Balancer balances the "connections" among backend servers. There are 3 industry-standard algorithms available to choose one among them. The choice depends on your backend applications and how well the load has ro be balanced.
Round-Robin: The round‑robin load balancer forwards a client request to each server in turn. When it reaches the end of the list, the load balancer loops back and goes down the list again (sends the next request to the first listed server, the one after that to the second server, and so on).
Least-Connections: The least connections load balancing technique takes into account the current number of active connections on each server. The load balancer forwards the new request to the server that is currently serving the lowest number of active connections.
Source-based Balancing: Source IP Hash load balancing uses an algorithm that takes the source and destination IP address of the client and server to generate a unique hash key. This key is used to allocate the client to a particular server. We can consider this to the "server affinity".
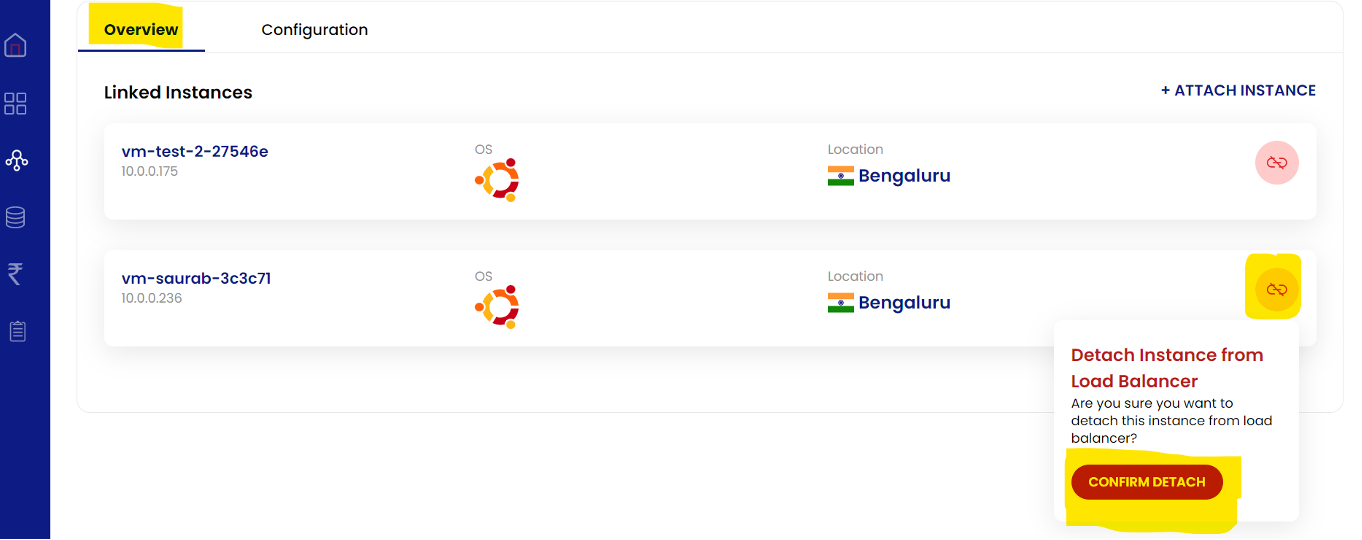
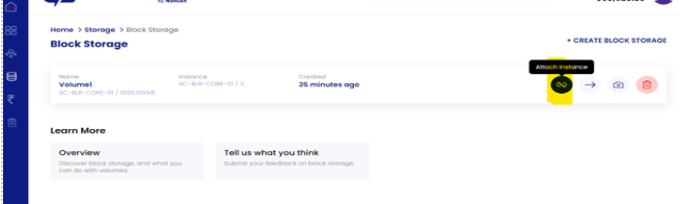
Attaching and detaching of VM to the Load Balancer:
- Please navigate to the "Network" icon on the navigation pane, and choose “Load Balancer” and click “Manage”.
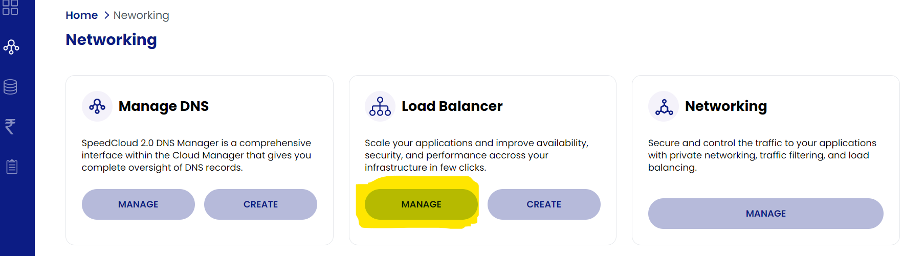
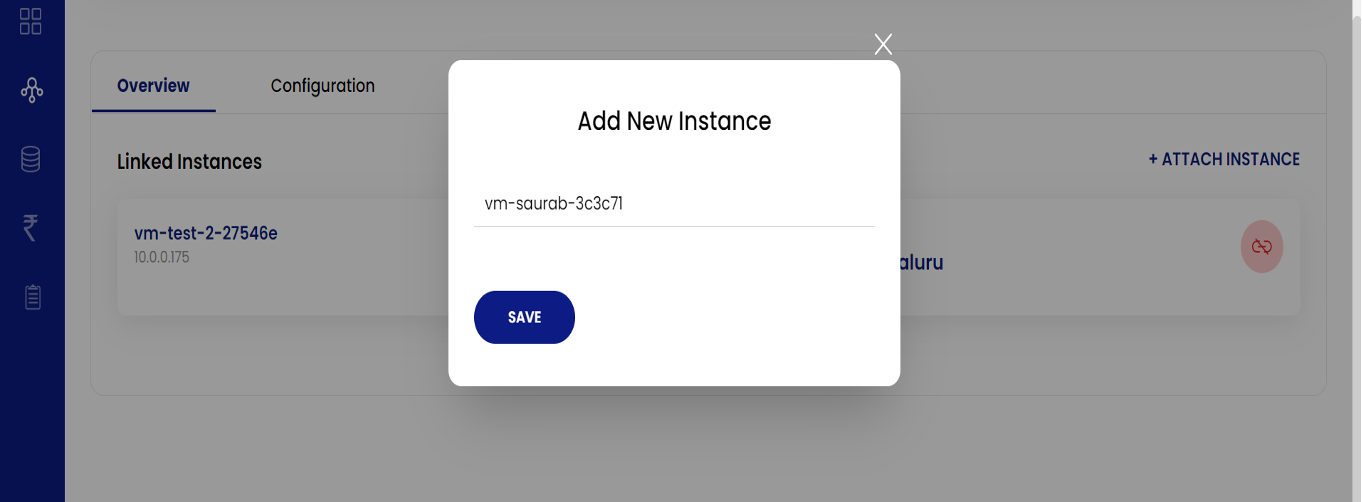
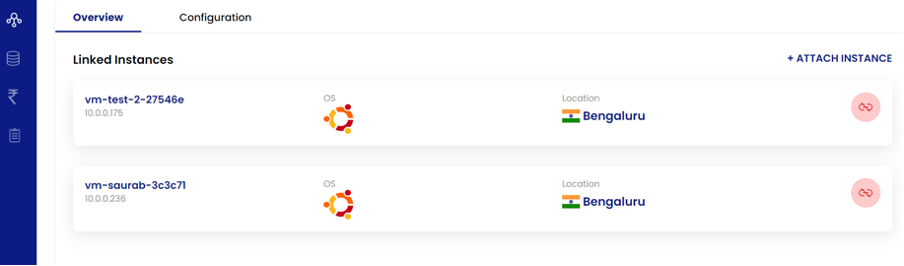
- Choose the name of the “Load Balancer”, and click on “Attach Instance”.
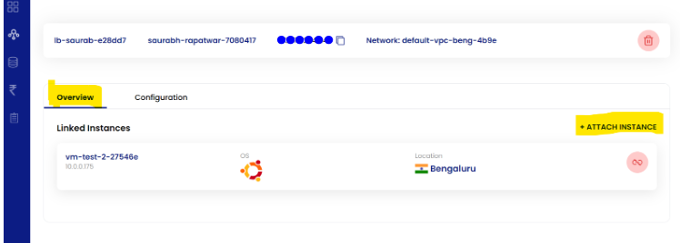
- On pressing “Save”, the instance should be added behind the Load Balancer.
- To detach, select the created load balancer where you wanted to detach the VM from, on the Overview Tab, click the icon and “confirm detach”.
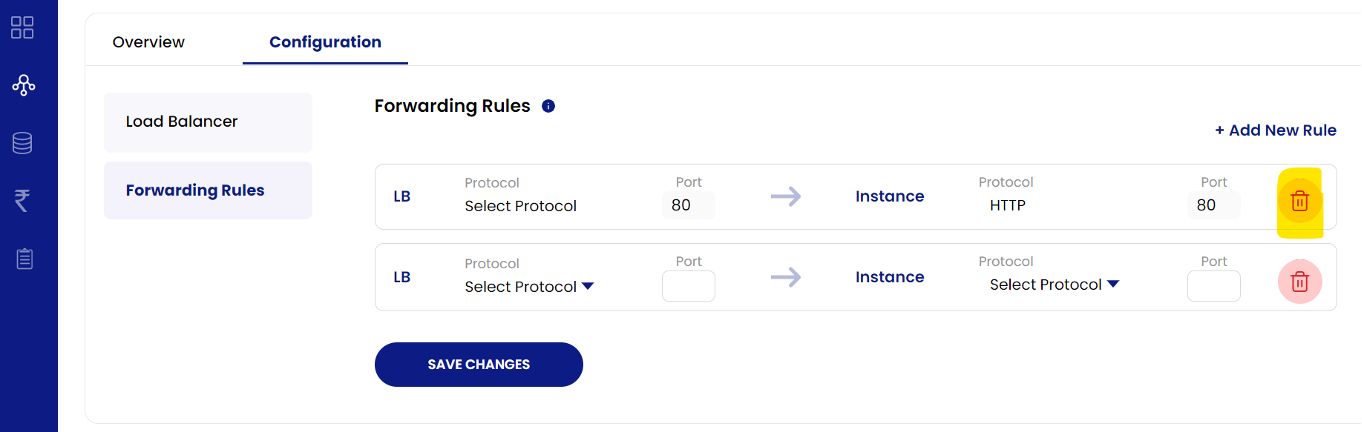
Managing the Load Balancer:
The load balancer can also be edited or managed once created. The mentioned below steps are to be followed to manage the load balancer.
- In the left Navigation Pane, click on networking, select “Load Balancer” and click “Manage”.
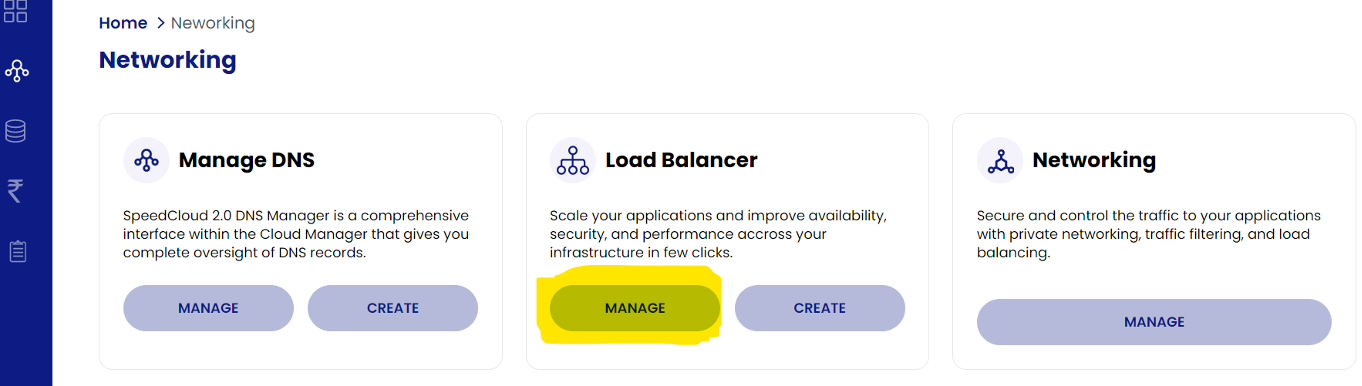
- Select the “Load Balancer Name” and click on the “configuration” tab.
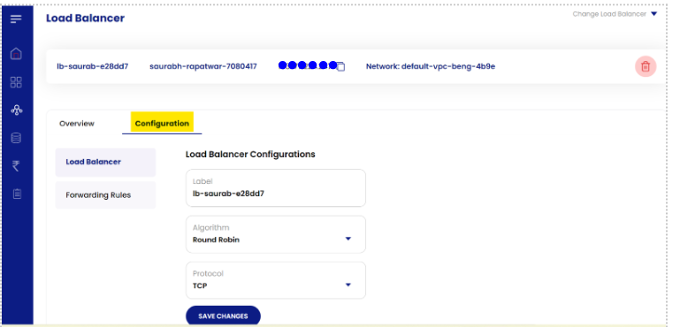
- You may perform changes to “labels”, “algorithm” and the “protocol”.
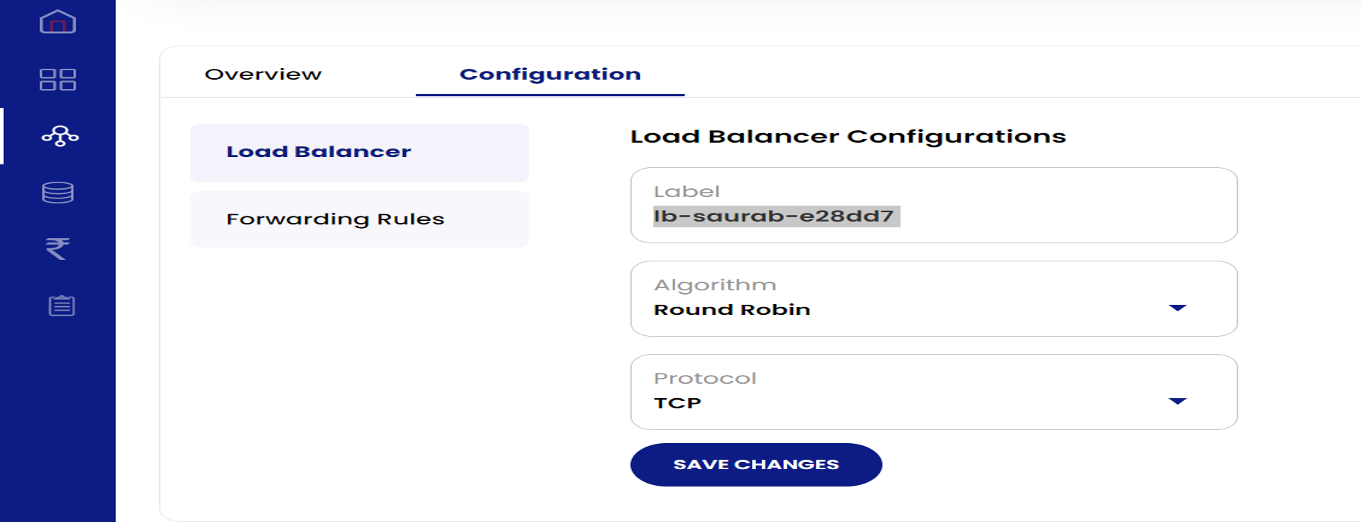
- Choose “Forwarding Rules” to add or modify forwarding rules.

- You may also delete the “forwarding rules” by clicking on “delete” icon.
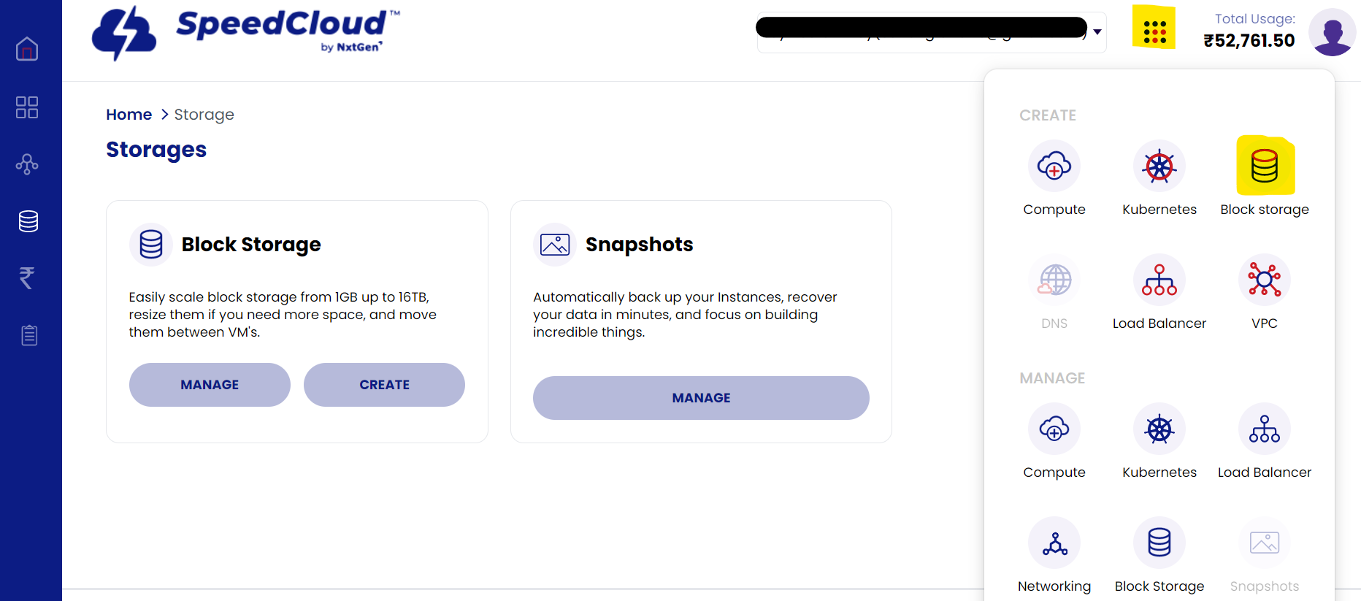
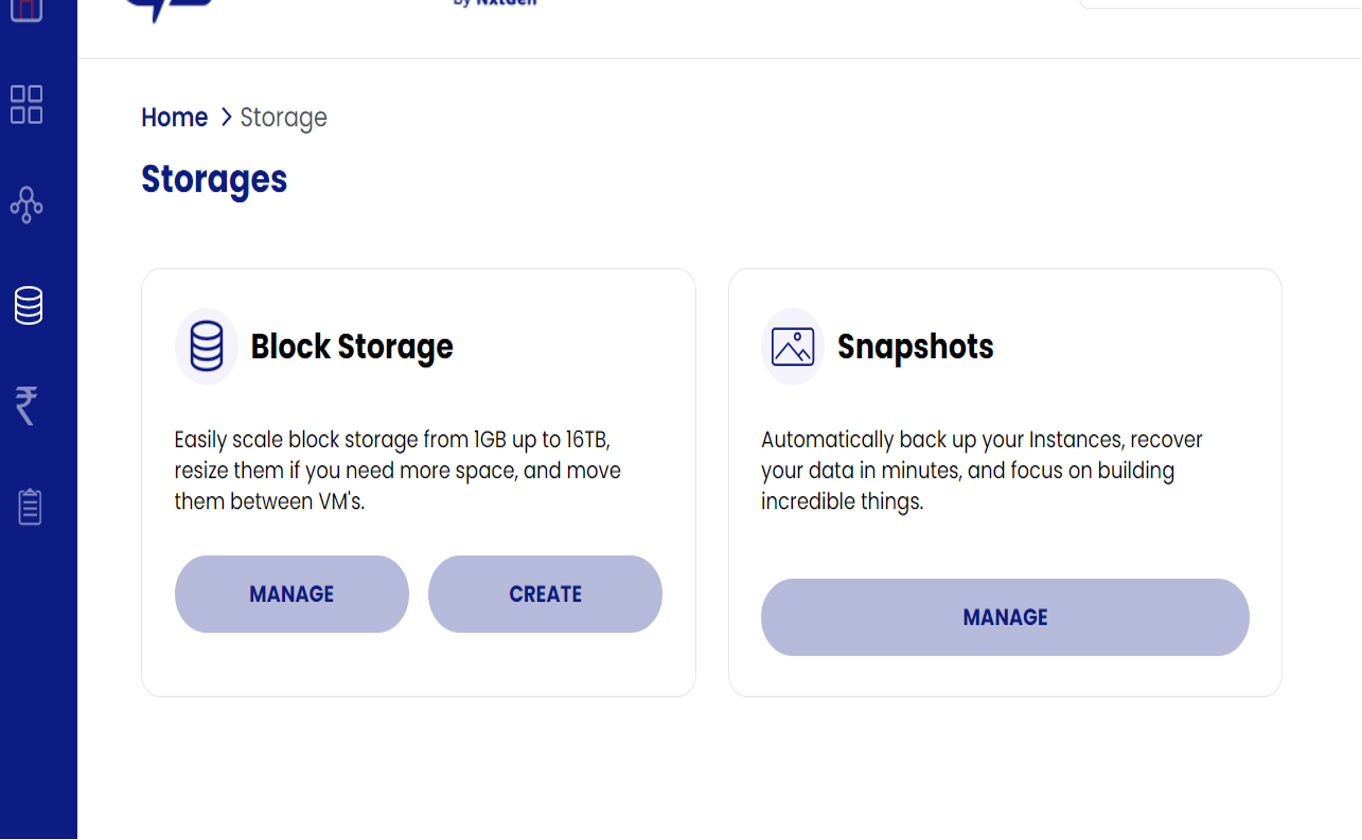
Block Storage Devices
Block Storage are the additional block volumes or mainly “data volumes” which can be provisioned and attached to the Virtual Machines. These can be attached to the Virtual Machines and manually formatted.
Creation of Block storage devices:
- From the quick navigation icon, please choose the “Block Storage” icon.

- To create a block storage device, please click on “create”, choose a project, “select an instance to be attached to” and “name the volume”.
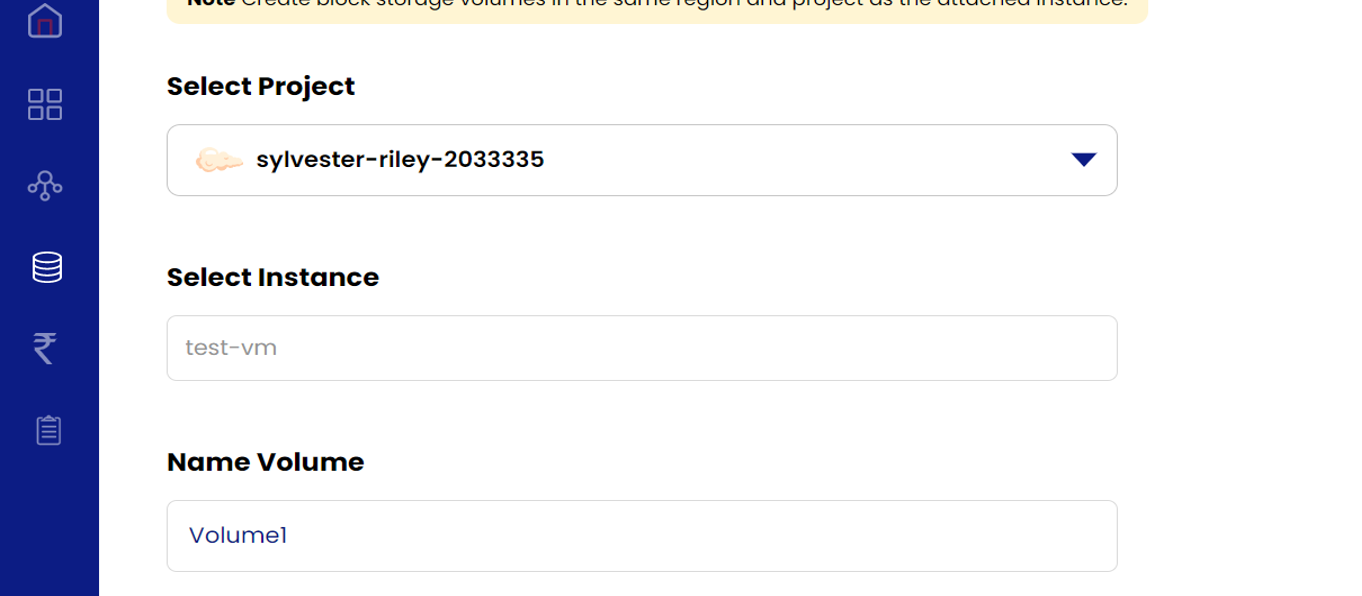
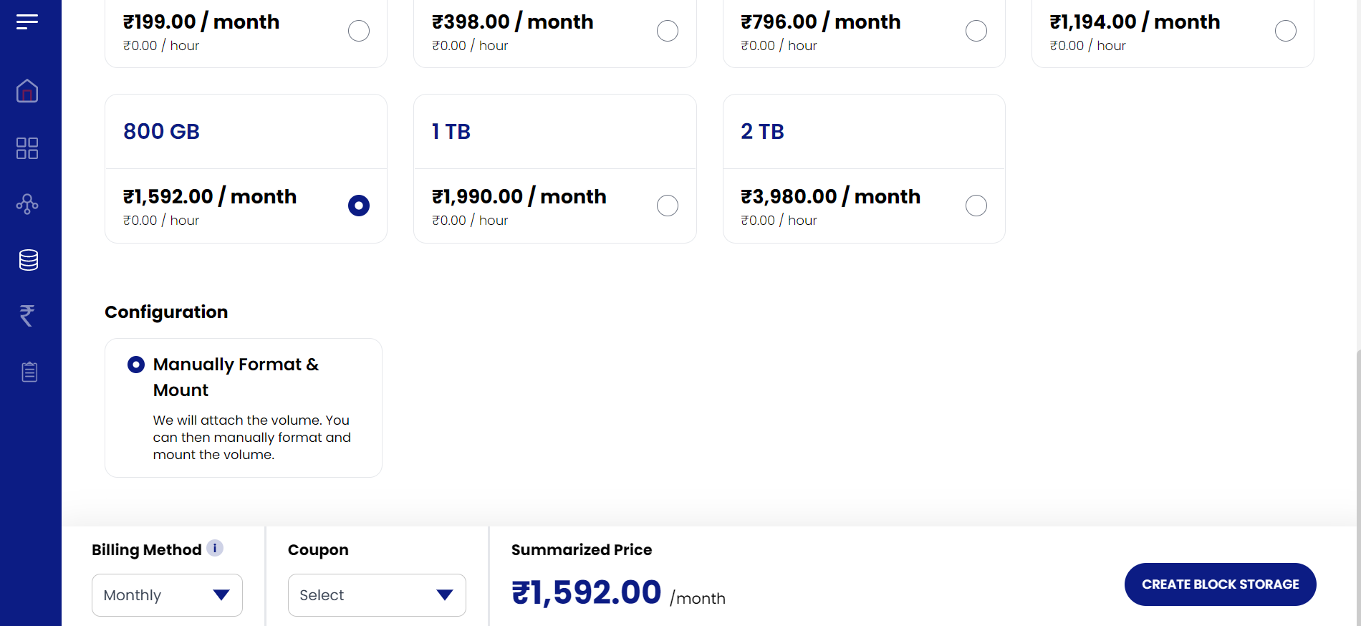
- Select the “size” under the “volume”.

- Under configuration choose the default option “manually mount and format”.

- Select the billing method as Monthly / Quarterly / Semi-Annually / Yearly from the dropdown so that billing is generated according to the selected billing method and choose to create the block storage.
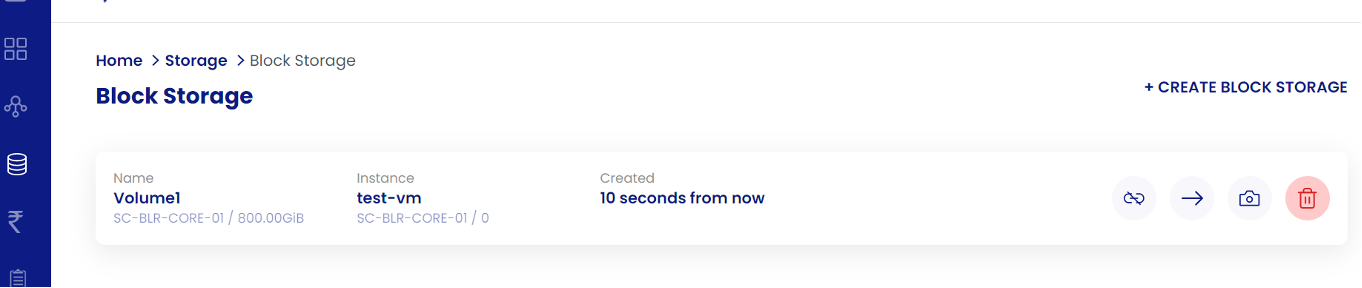
- Once the request has been created, please wait for the storage device to get created and appear on the portal. Please also remember that it attaches to the Virtual Machine as well.
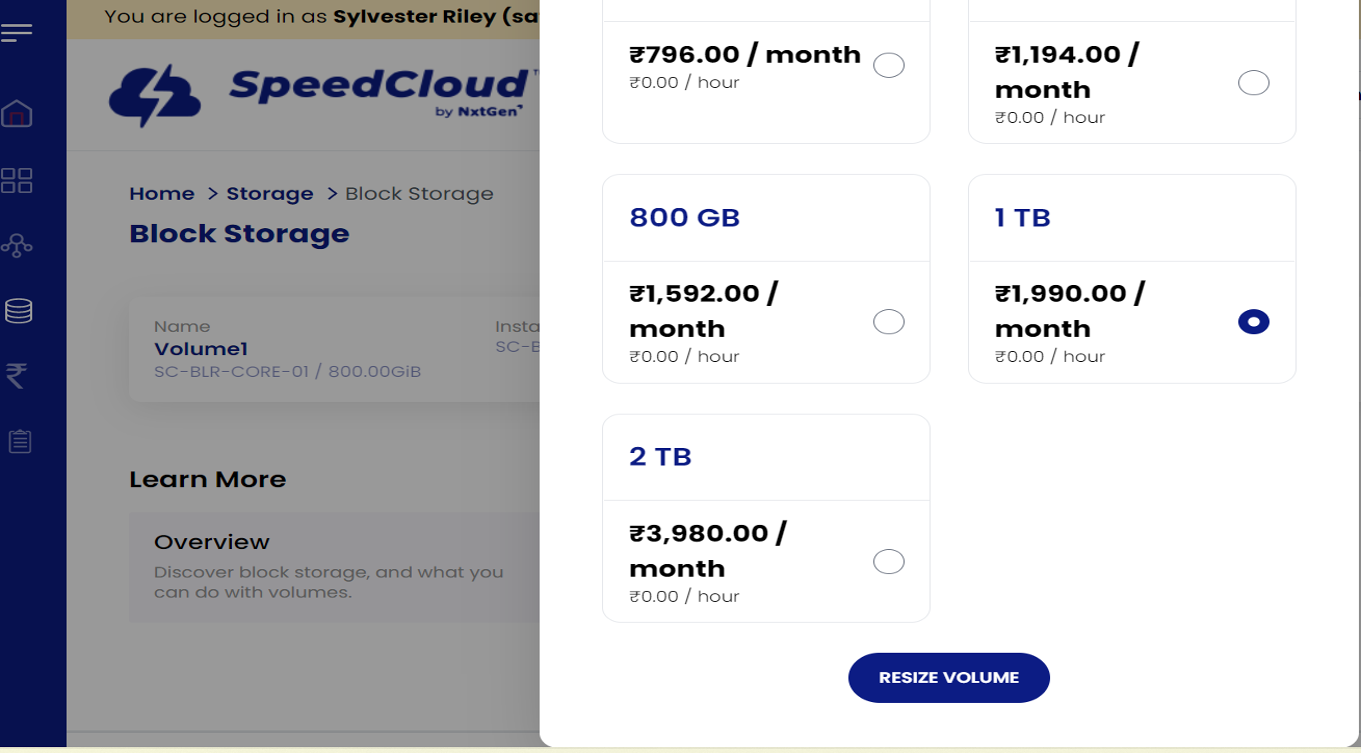
Resizing block storage devices:
Note: Shrinking of block storage devices are unsupported! This is a safety mechanism because the content managed by the filesystem may be scattered in the end-blocks, thus if allowed, causing the shrinking to lead permanent data loss!
- Please navigate to the “Block Storage” icon and select “manage”.
- Please choose the block storage device and select the “Resize Block Storage” and choose the “size”.

- Please review the billing and click "Resize Volume".
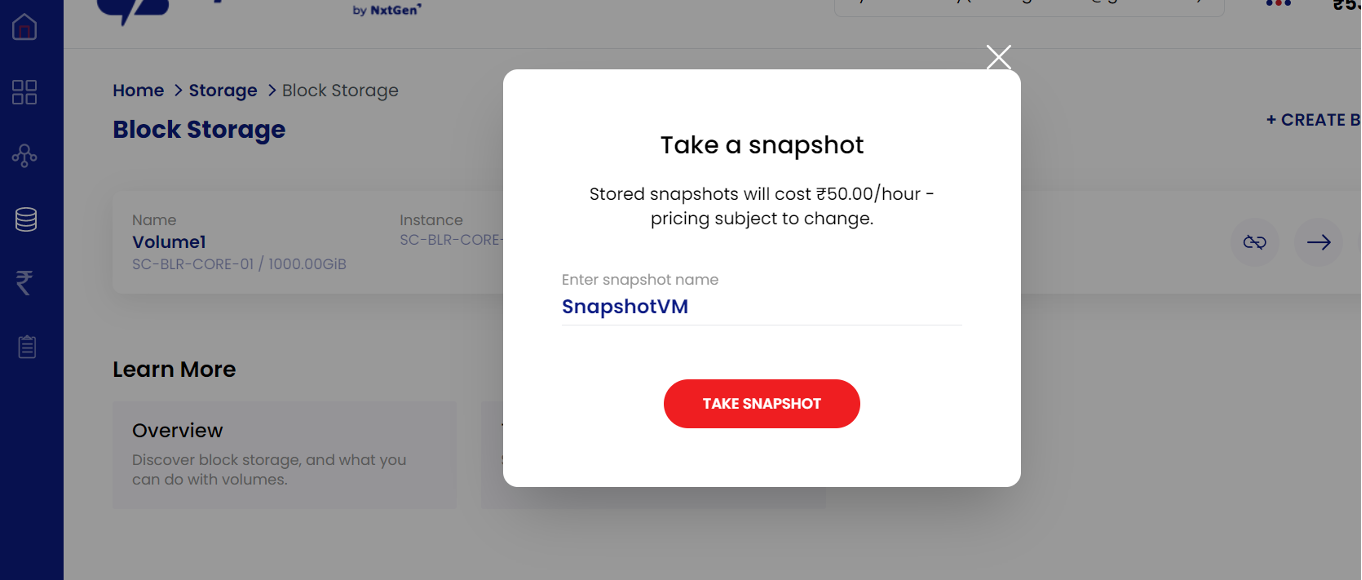
Creation of disk snapshots:
Snapshots are the point-in-time copy of the state of the disk. SpeedCloud 2.0 currently only Disk-level snapshots and are full-snapshots. Incremental snapshots are not supported. The snapshot captured will only belong to a particular VM, and no other functionalities can be done. For example, it won't be possible to convert it to an OS template, or convert it as a disk and attach it to other Virtual Machine as a secondary disk.
- In the navigate pane on the left, please choose the "Storage" icon, and “Manage” the “Snapshots”.
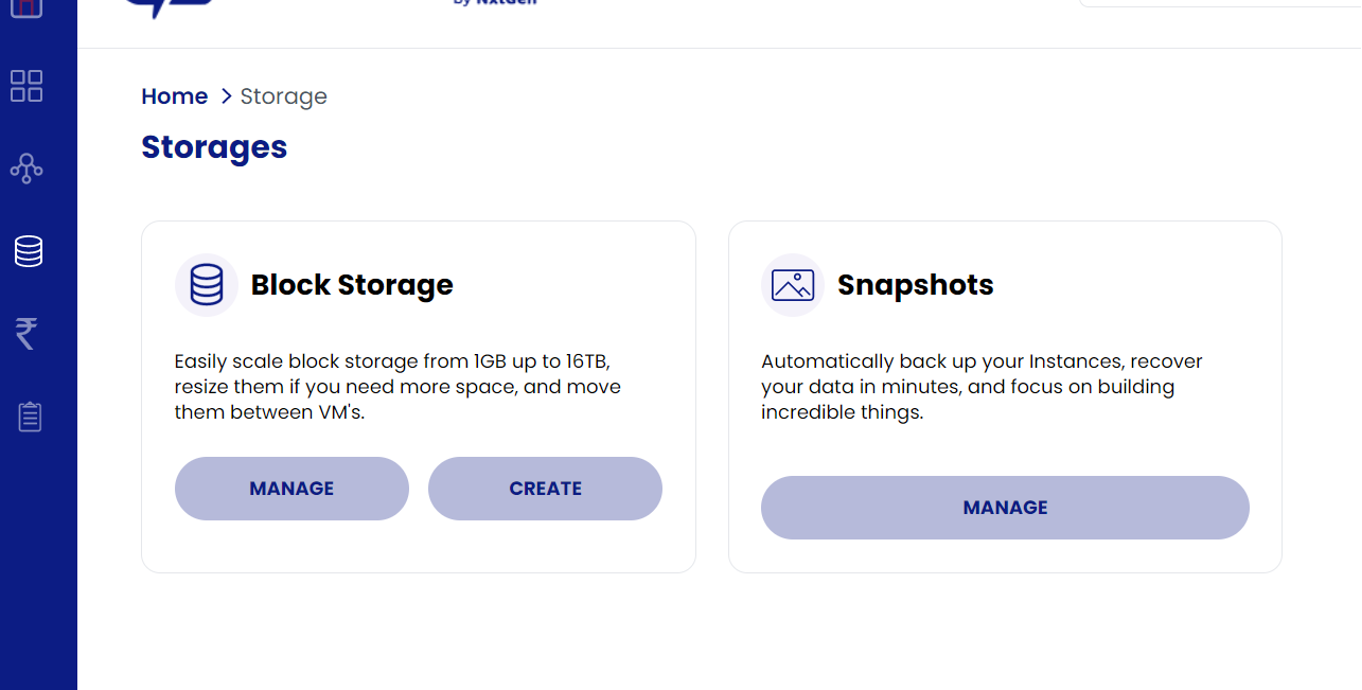
- Please click on “take snapshot” button and give it a “name”.
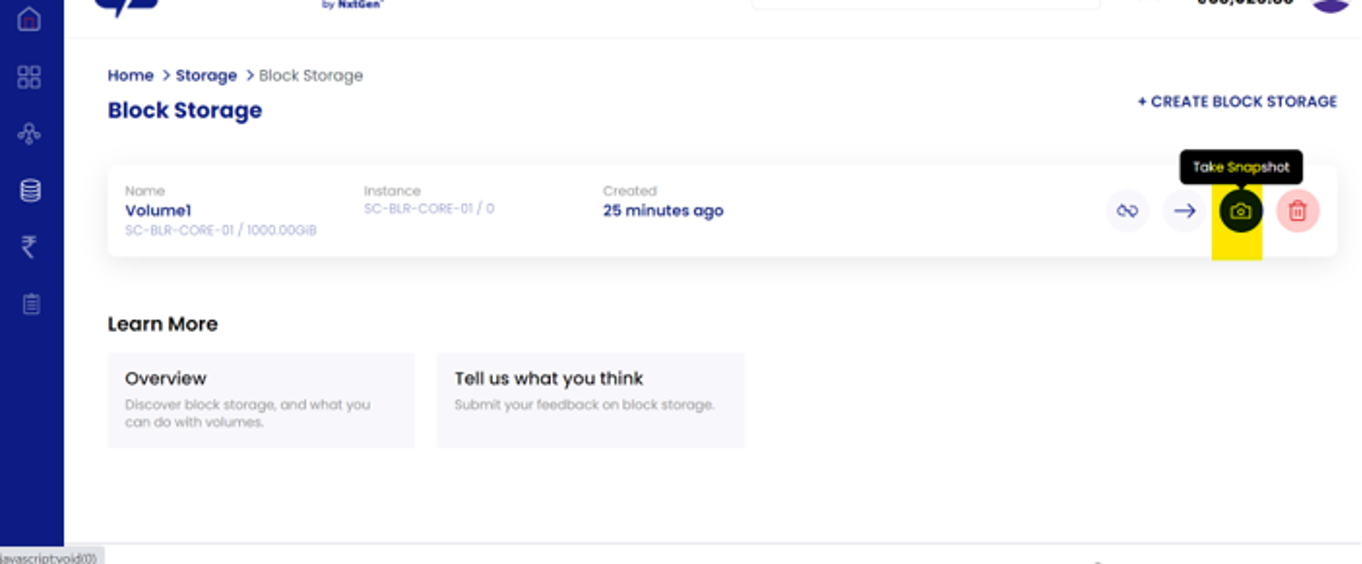
- Please wait for the snapshot to be created. You may also go ahead with the restoration of the snapshots by navigating to “Snapshots” and “Manage” buttons. The “restore snapshot” can be made use to restore to the state in the snapshot. Please proceed with caution!
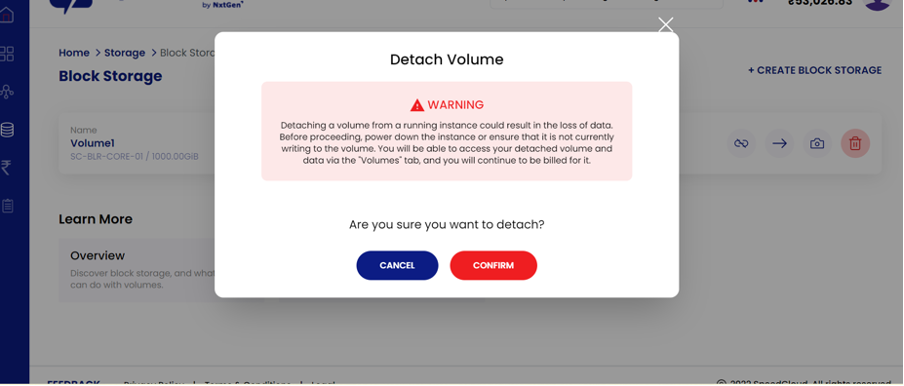
Detaching block storage device from a VM:
- On the navigation pane to the left, please choose "Storage" icon, select “Block Storage” and choose “manage”.
- Please select the volume and click on “Detach Instance”.
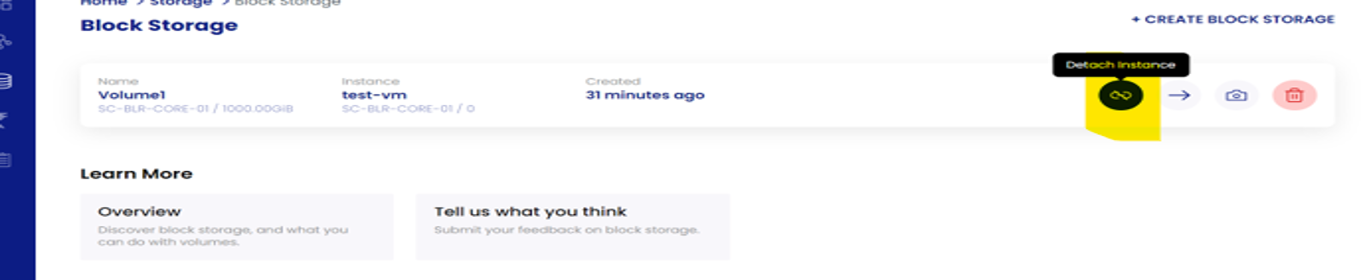
- Please note that this operation results in forceful removal of the block device from the VM. Please ensure the volume is unmounted from the Operating System for clean removal.
Attaching block storage device to a VM:
- On the navigation pane to the left, please choose "Storage" icon, select “Block Storage” and choose “manage”.

- Please select the block storage device and click on “Attach to Instance”.
- Please choose the Virtual Machine where this device must be attached.

Deletion of block storage devices:
- On the navigation pane to the left, please choose the "Storage" icon, select “Block Storage” and choose “manage”.

- Please select “delete” button on the block storage you’d wish to delete.

- Please proceed with caution during the deletion of the Block Storage device.

Network Management
Below are the network models supported on SpeedCloud 2.0:
-
Elastic Networks – Elastic Network offers a flexible Virtual Network and has a simplified network operation. It offers basic functionalities like Firewall, Egress Functionality, Load Balancer and Remote Access VPN. This is the recommended model for most use-cases.
-
VPC Networks – VPC Networks offer network tiering, wherein there can be many networks and “routing” can be achieved across. VPC networks are same as Elastic Networks and have same features the Elastic Network has, but offer additional features like “Site to Site VPN”, fine-grained “Network Access Control Lists”. VPC networks are chargeable at additional rates.
Please choose one between the models for the creation of the networks.
Creation of the VPC Network:
- In the quick navigation icon, please choose the “VPC” button.
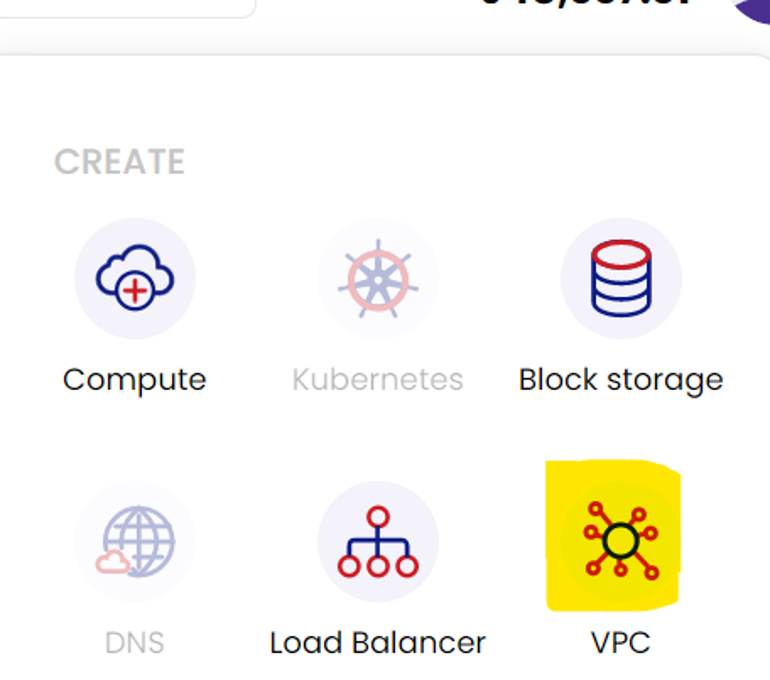
- Choose “Create VPC Network”.
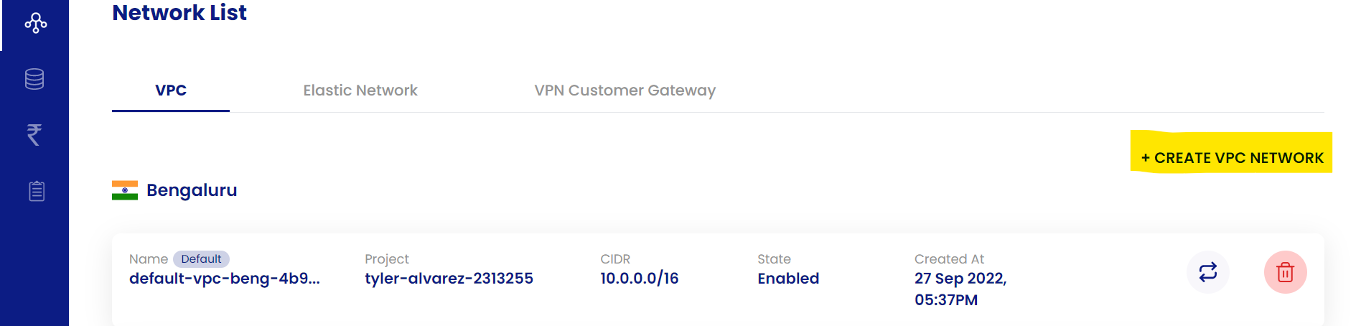
- Select the “Zone” and the “Project”.
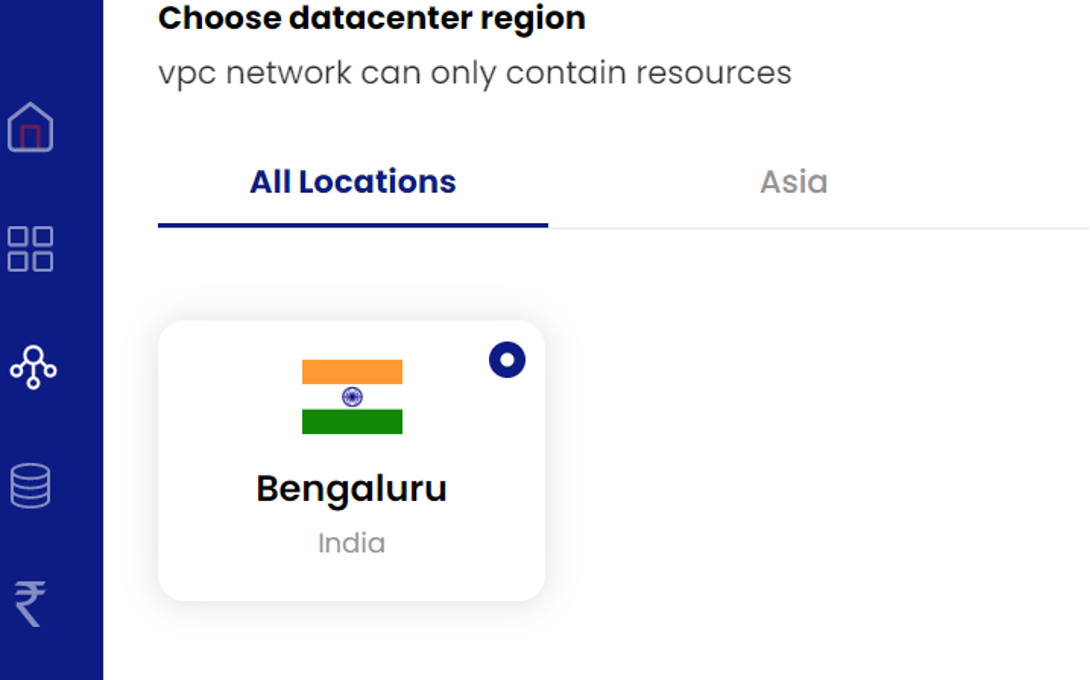
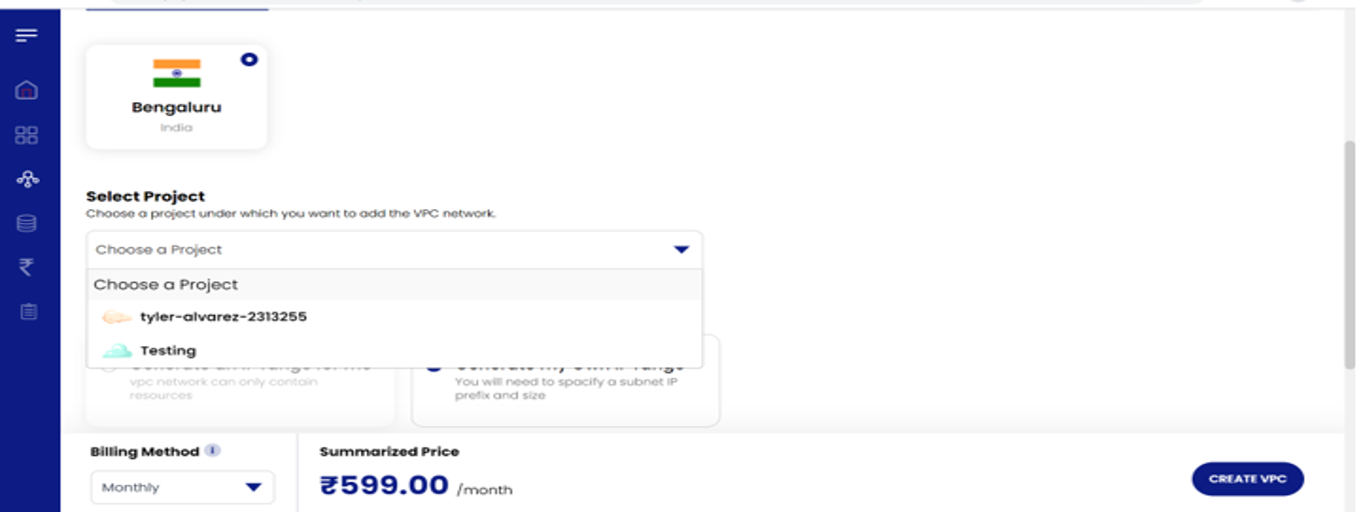
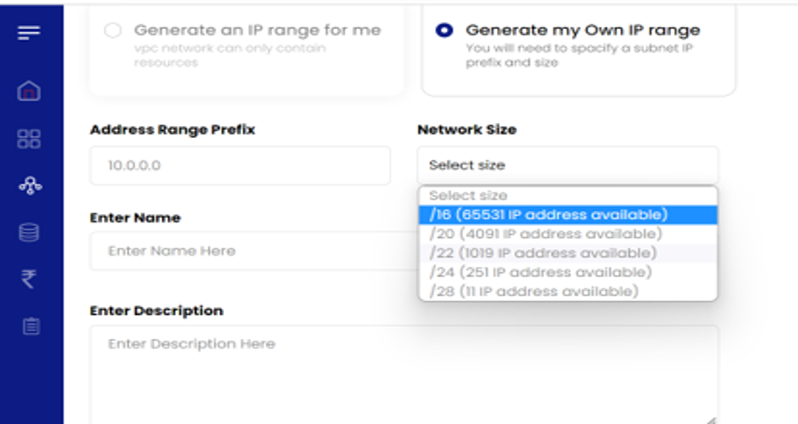
- Please choose your own network ranges as per RFC 1918 or let the platform generate it for you.
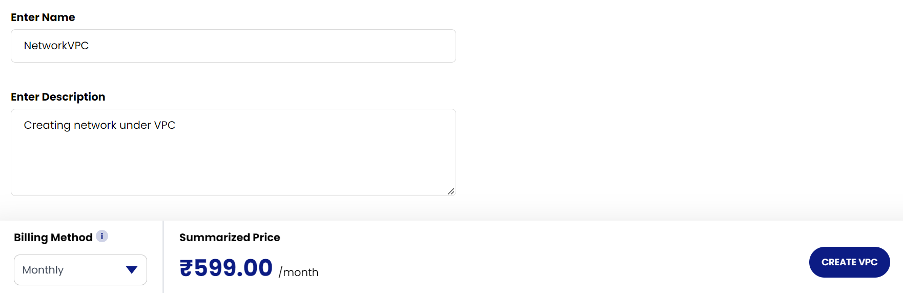
- Please add further details and click on “Create VPC”.
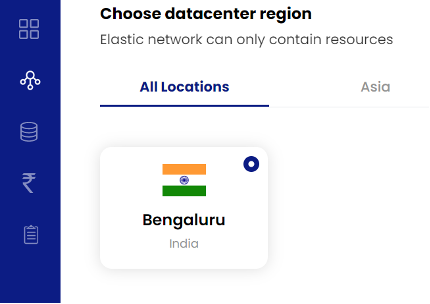
Creation of the Elastic Network:
- In the left navigation pane, please choose "Network icon" and choose “Network”. Please choose “Elastic” in this case.

- Please select the zone.
- Please select the “project”, “name” and the “description”.
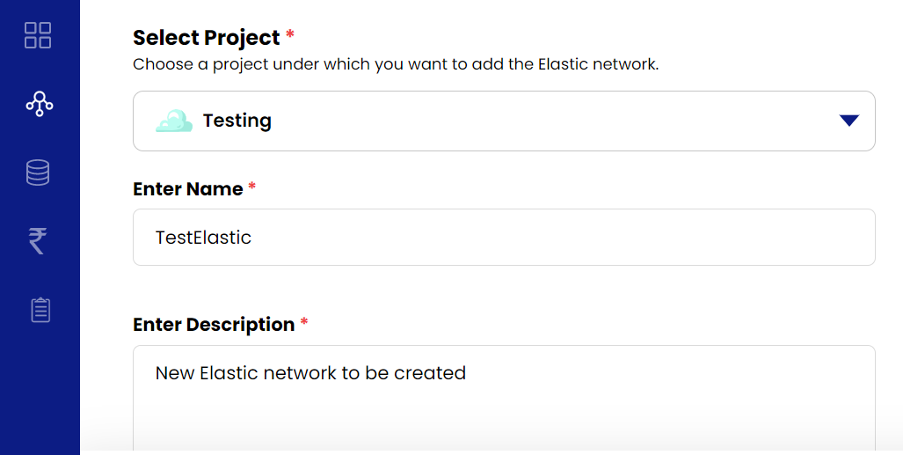
- Please enter any additional details. You may also choose any RFC 1918 private IP address ranges.
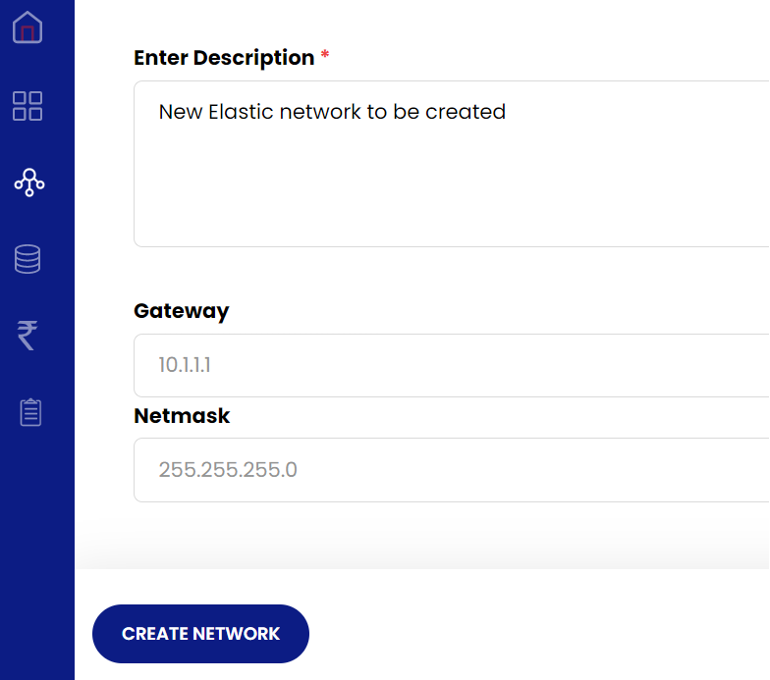
- The elastic network would be successfully created on clicking “Create Network”.
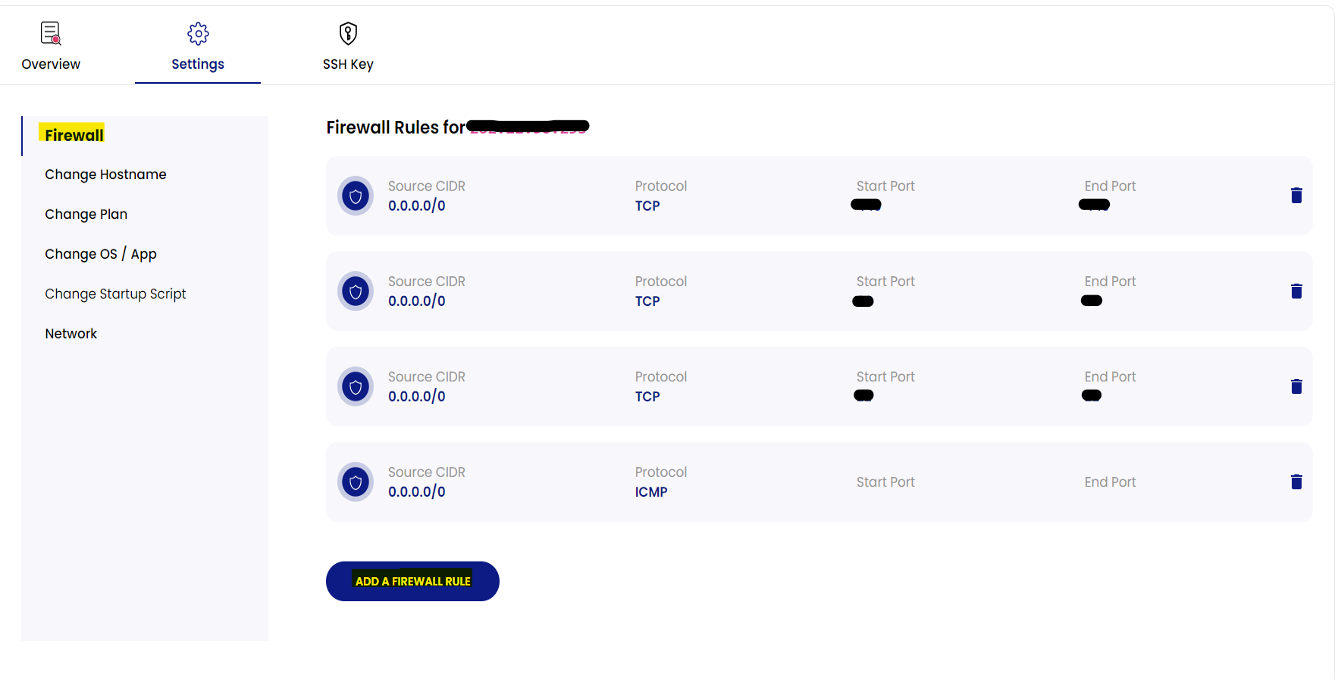
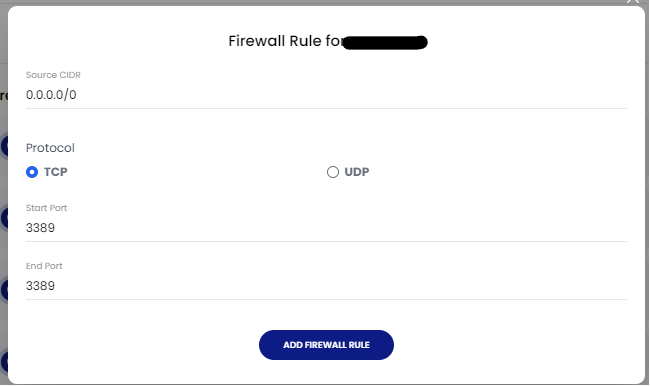
Firewall Management:
SpeedCloud 2.0 offers rules for inbound firewall management. Below are the operations to be performed for Elastic and VPC Networks for managing the traffic destined towards the Virtual Machines.
The below steps are only applicable “for Elastic Networks” as the “Firewall” functionality is available only on “Elastic Networks”.
- Please navigate to any of the VMs, then Settings and choose the “Firewall” option. Please enter the needed firewall rules.
- And click on “Add Firewall Rule”.
The below steps are only applicable “for VPC Networks” as the “ACL” functionality is available only on “VPC Networks”.
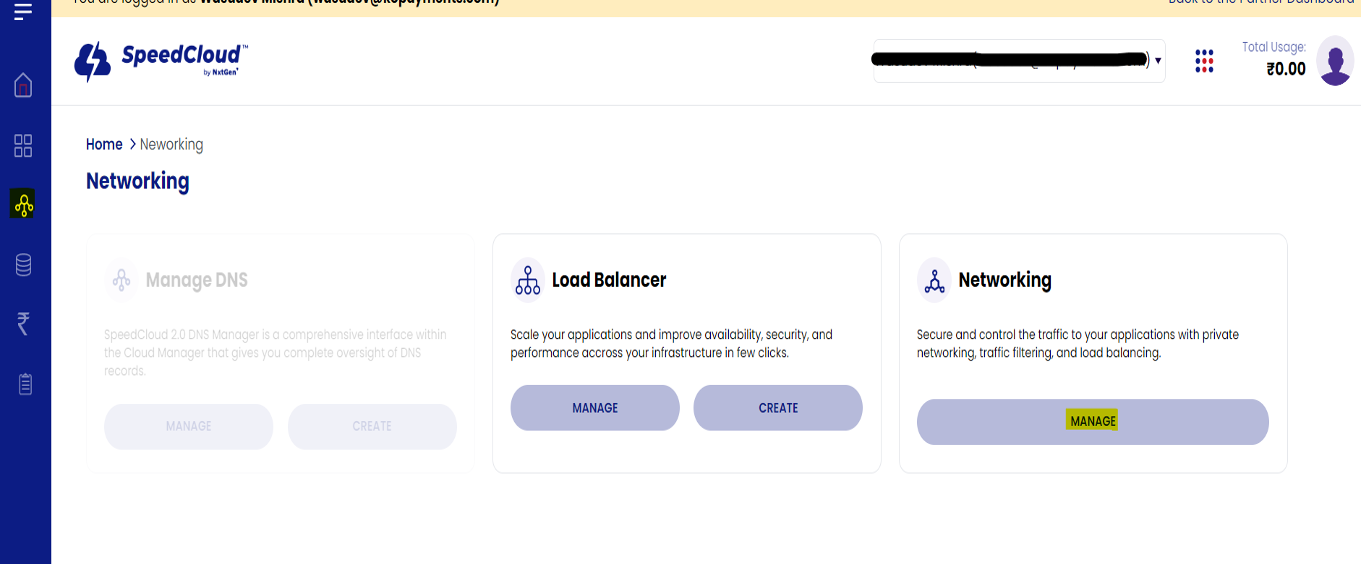
- In the Navigation pane, choose “Network” and select “Manage”.
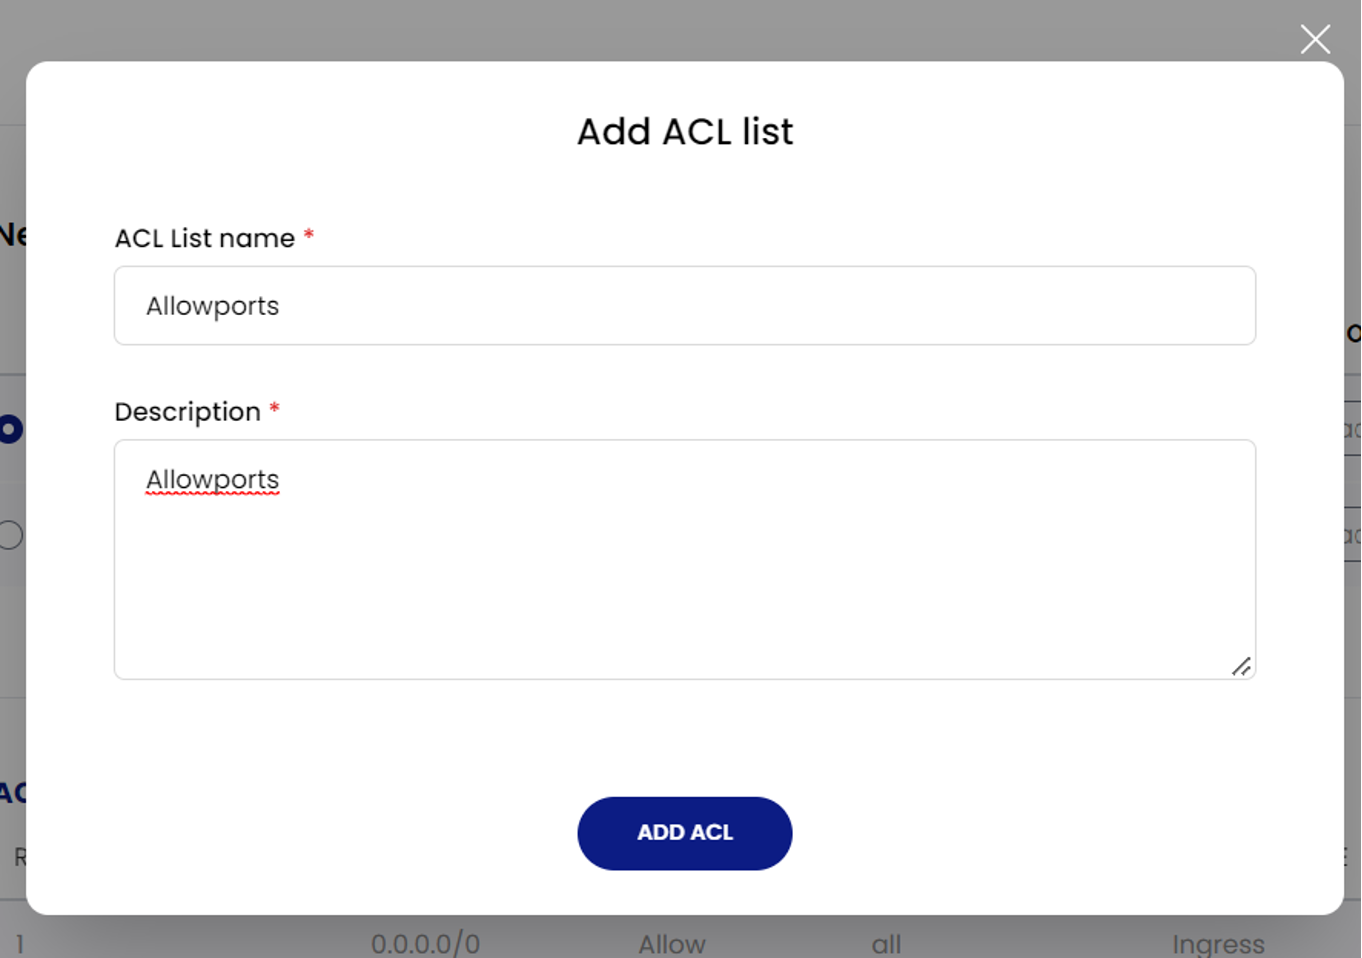
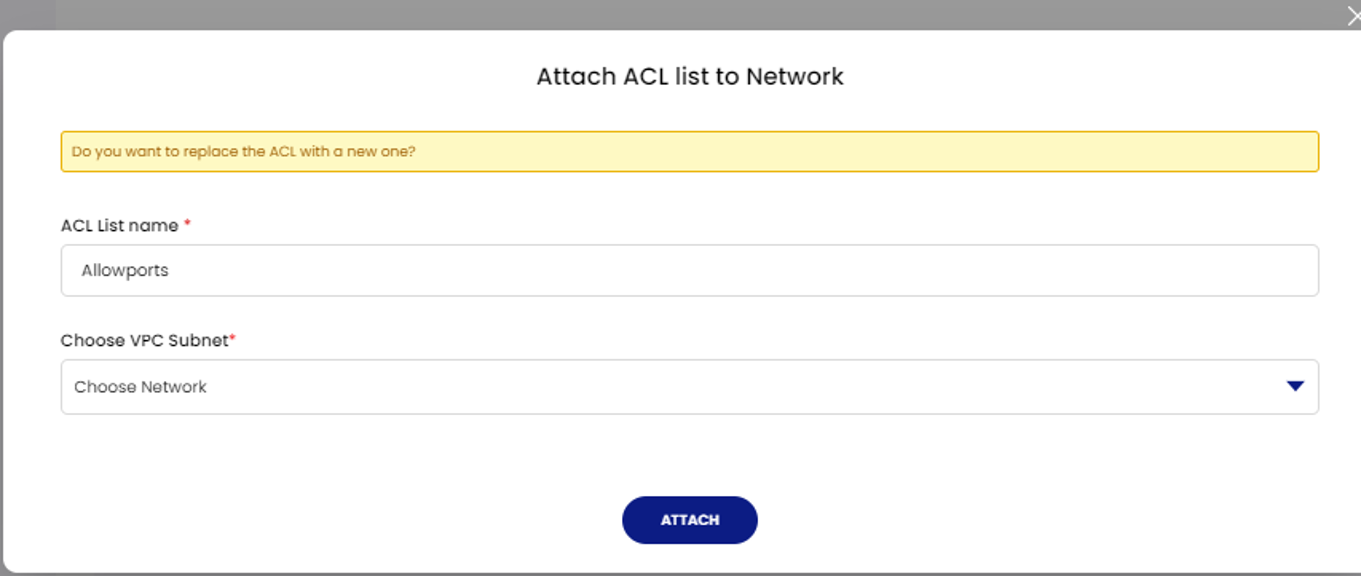
- Choose the name of the VPC network and choose “Network ACL Lists” and click on “Add Network ACL List”.
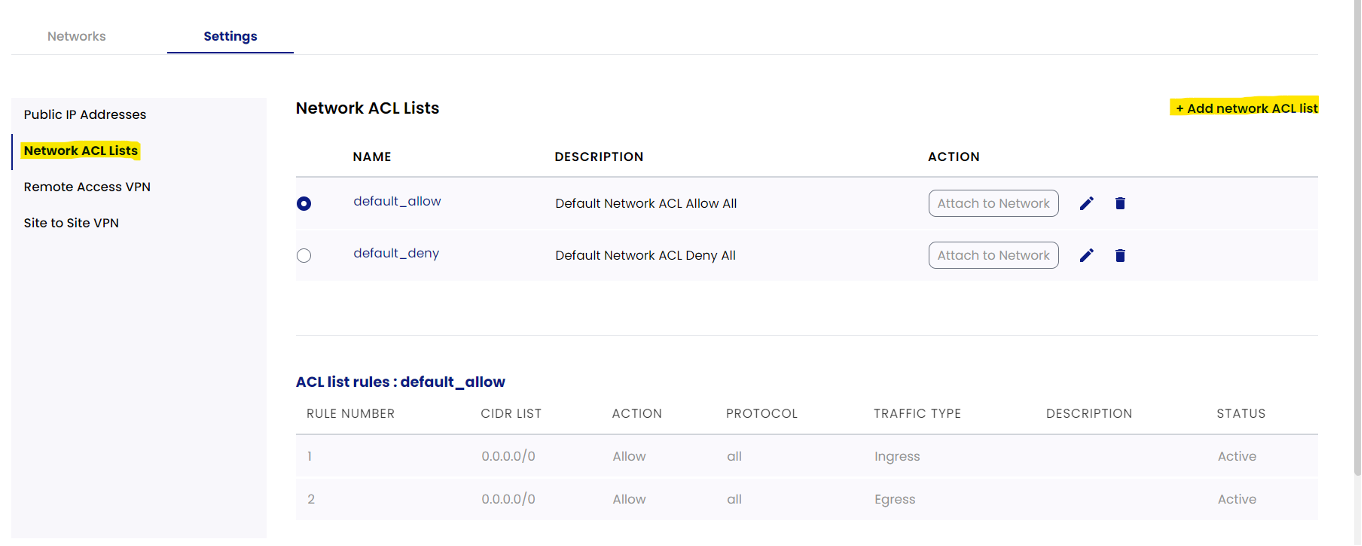
- Please give it a name.
- Select the created ACL list name and choose “Add ACL Rule”.
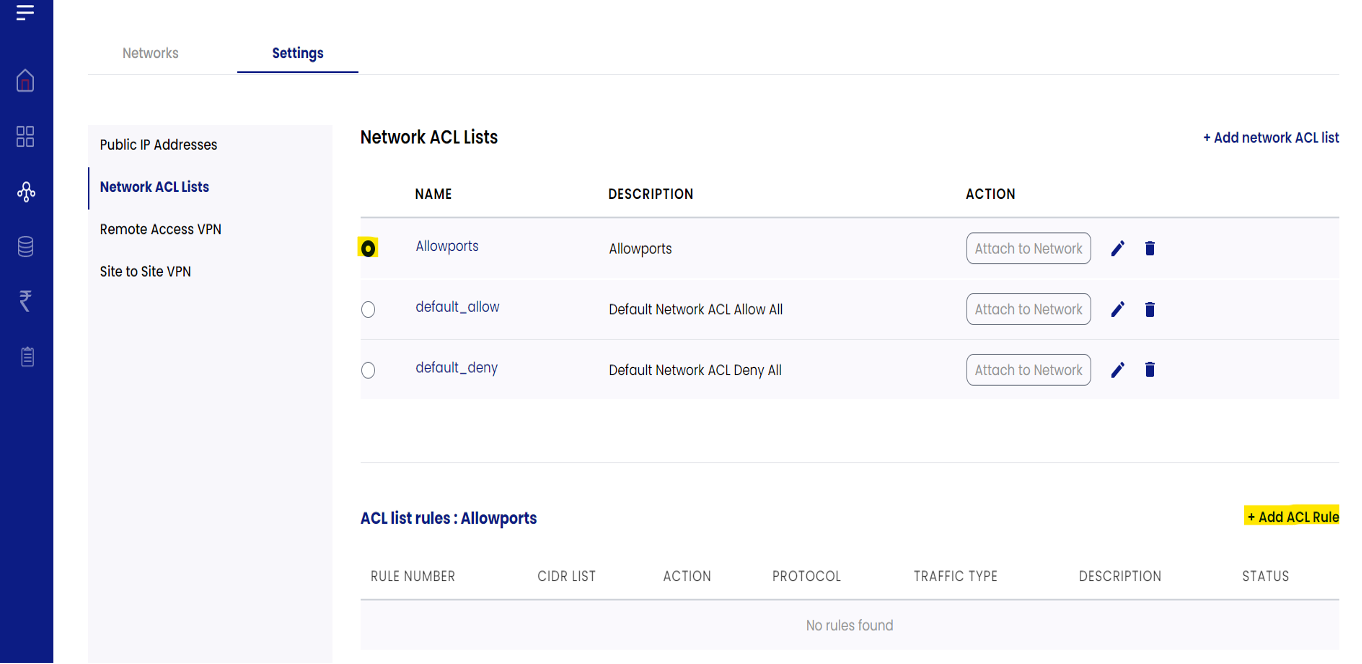
- Choose some example rules as per the screenshot below.

- We can also add the range of ports.
- And Select Attach network for the ACL list created.
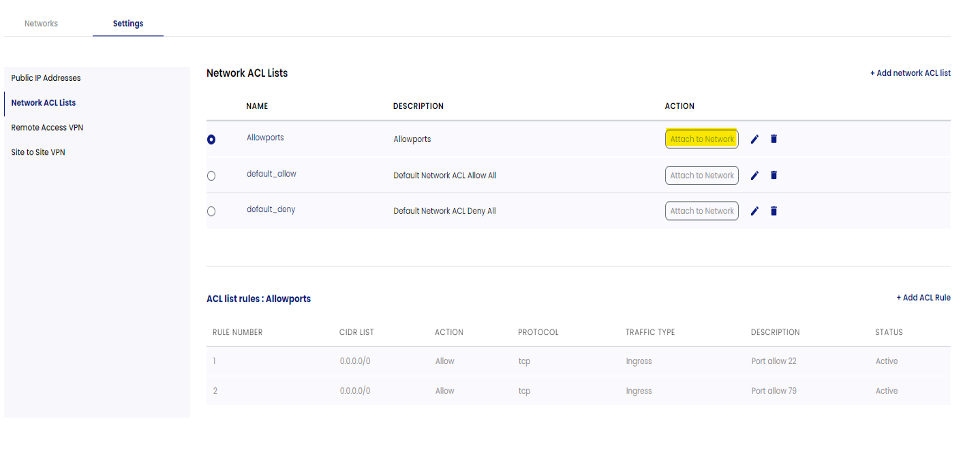
- Now under Choose VPC Subnet select the required network and click on Attach. The rule will be implemented successfully.
Billing
Billing on Speed Cloud 2.0 works in a subscription fashion. In-line with modern-day apps and services, subscription-based billing models are an efficient way to deliver service value. This not only eliminates heavy upfront costs for any service purchase, but also gives you the flexibility to cancel any time and pay for only the amount or duration of use.
Billing Summary:
Below is the list of availability in the billing section:
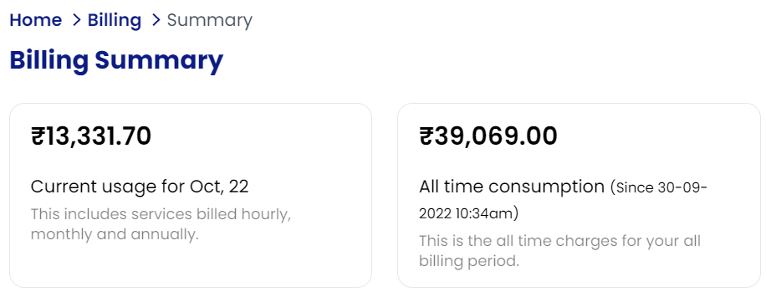
- Current Usage
- All time consumption
- Summary
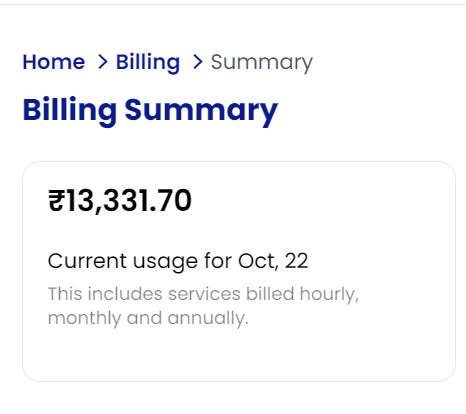
- Current Usage: The services billed hourly, monthly, and annually will be displayed.
- All-time Consumption: This is the all-time charges for your all billing period.
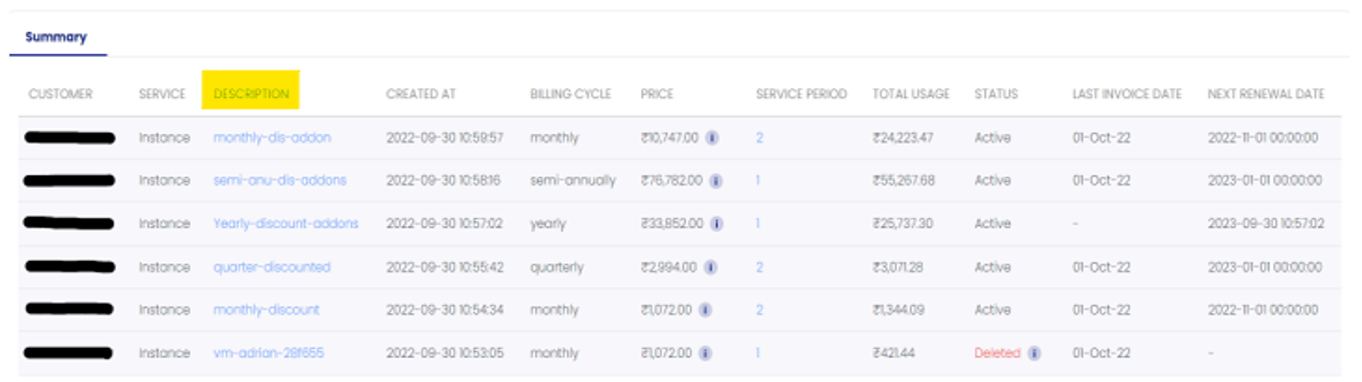
- Summary: The section consists of information such as customer details, service, Description, created at, Billing cycle, Price, Service period, Total usage, Status, Last invoice date and next renewal date details.
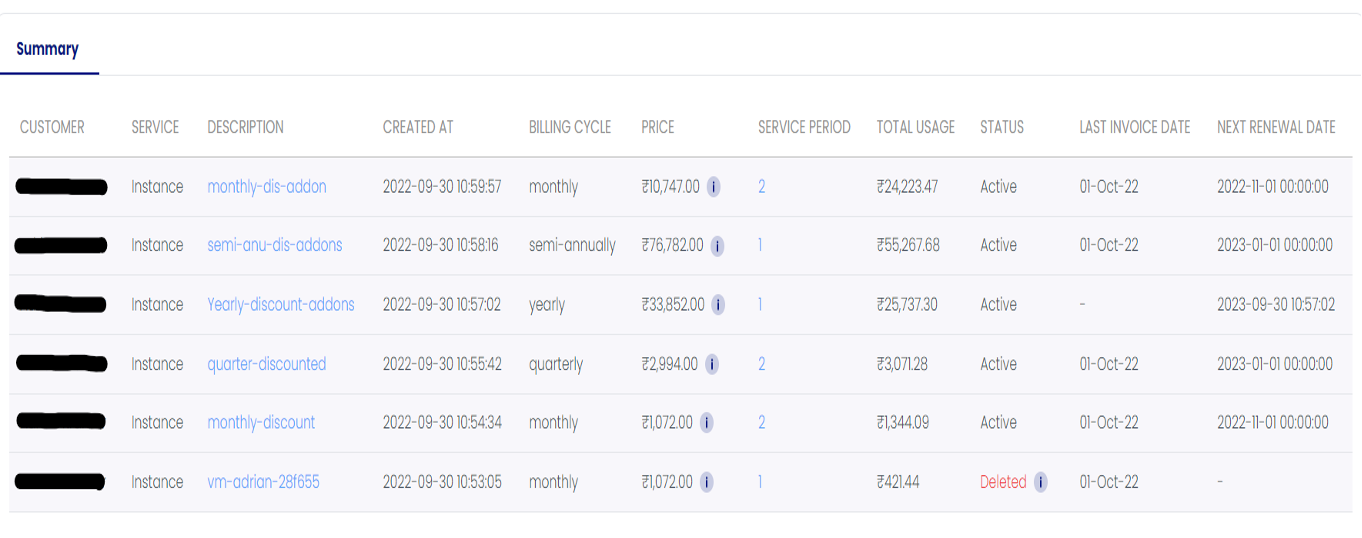
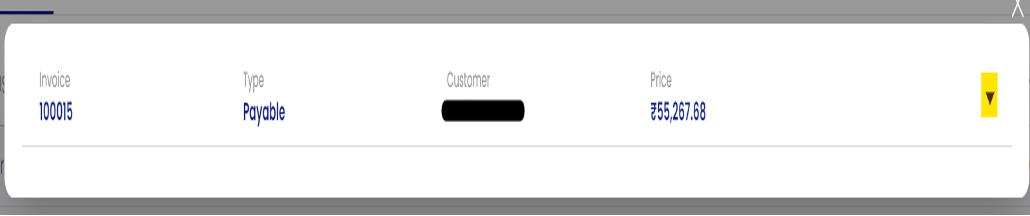
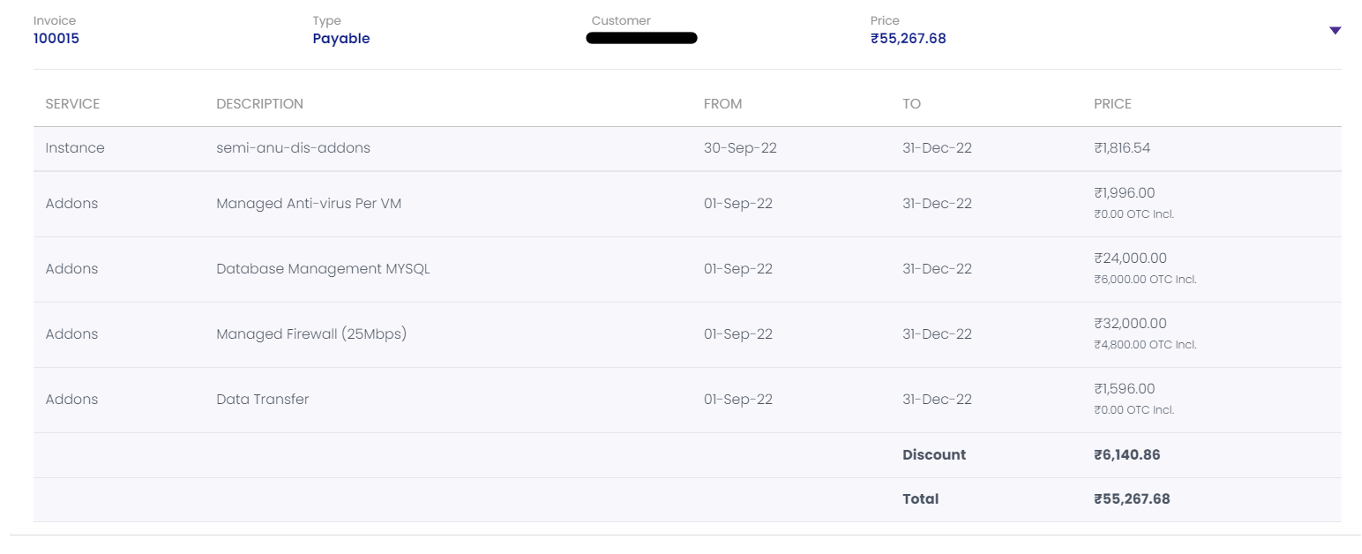
Invoices in Billing Summary:
To check the invoice details, follow the steps below:
- To navigate to billing section, choose the Billing icon on the left-hand side > Under Billing Summary > Go to Description > Tap on the service of invoice required > Click on the dropdown icon for the detailed information.
FAQs
-
Can I take full VM Backup on SpeedCloud?
Ans: Backups are enabled by Veeam. SpeedCloud also offers disk-level snapshots. -
Can I connect to my Virtual Machines remotely using VPN?
Ans: Yes, the platform offers native support to create Remote Access VPN. Native windows clients can be made use of. -
How many numbers of users can be added to Remote access VPN?
Ans: There can be any number of Remote Access VPN Users. -
Will change in OS template cause for the additional charges in billing?
Ans: No, there are no additional charges. -
Can I establish Site to Site VPN connection?
Ans: Yes. Platform offers Site to Site VPN connectivity but only with VPC Networks. -
What is the maximum storage limitation available for Block storage?
Ans: You can scale from 1GB up to 16TB. -
What would be the billing price of the Snapshots?
Ans: Please connect with your Account Manager to know the updated prices.